Multi-Step Tooltip Guide with CleverTap
This guide walks you through creating a multi-step tooltip Guide in the Digia Engage Dashboard, connecting it to CleverTap, and testing it on a device. By the end, you should have:
- a tooltip Guide designed and saved or active in Digia Engage
- a list of anchor keys used by each Guide step
- a CleverTap In-App campaign that points to the Digia Guide campaign
- a test device where you can trigger and verify the tour
A Guide is an anchored experience. Use a tooltip Guide when you want to explain specific UI elements in context, such as:
- introducing a new filter, cart, or profile control
- walking new users through a checkout flow
- explaining account, wallet, rewards, or profile features
- onboarding users to a redesigned screen
Prefer a quick visual walkthrough first? Watch Creating Engaging Tooltip Guides with Native Experiences.
Before You Start
Make sure you have:
- Access to the correct Digia Engage project.
- Access to the matching CleverTap project.
- Your app must already be integrated with Digia Engage and CleverTap. Share the CleverTap developer integration guide with your app team if this setup is not complete yet.
- Your app team must have added
DigiaHostand registered the target UI elements withDigiaAnchororDigiaAnchorView. - The available anchor keys shared by your app team.
- The audience and trigger event decided in CleverTap, for example
App Launched,Product Viewed, orCheckout Started. - A test profile or test segment in CleverTap so you can verify the Guide before launch.
Anchor keys
An anchor key is the name your app team gives to a targetable UI element. When a Guide step runs, Digia looks for that exact key on the current screen and places the tooltip beside that element.
For example, your app team might share:
| Anchor key | What it points to |
|---|---|
filter_button | Filter button on the product listing screen |
cart_button | Cart icon in the header |
profile_tab | Profile tab in the bottom navigation |
The anchor key in Digia must match the app implementation exactly. If the anchor is not on screen when the campaign runs, that Guide step cannot attach to the UI element.
For developer setup details, see Setting Up Guide Anchors. After anchors are synced, review usable pages and anchors in Component Registry before building the campaign.
Create a New Guide Campaign
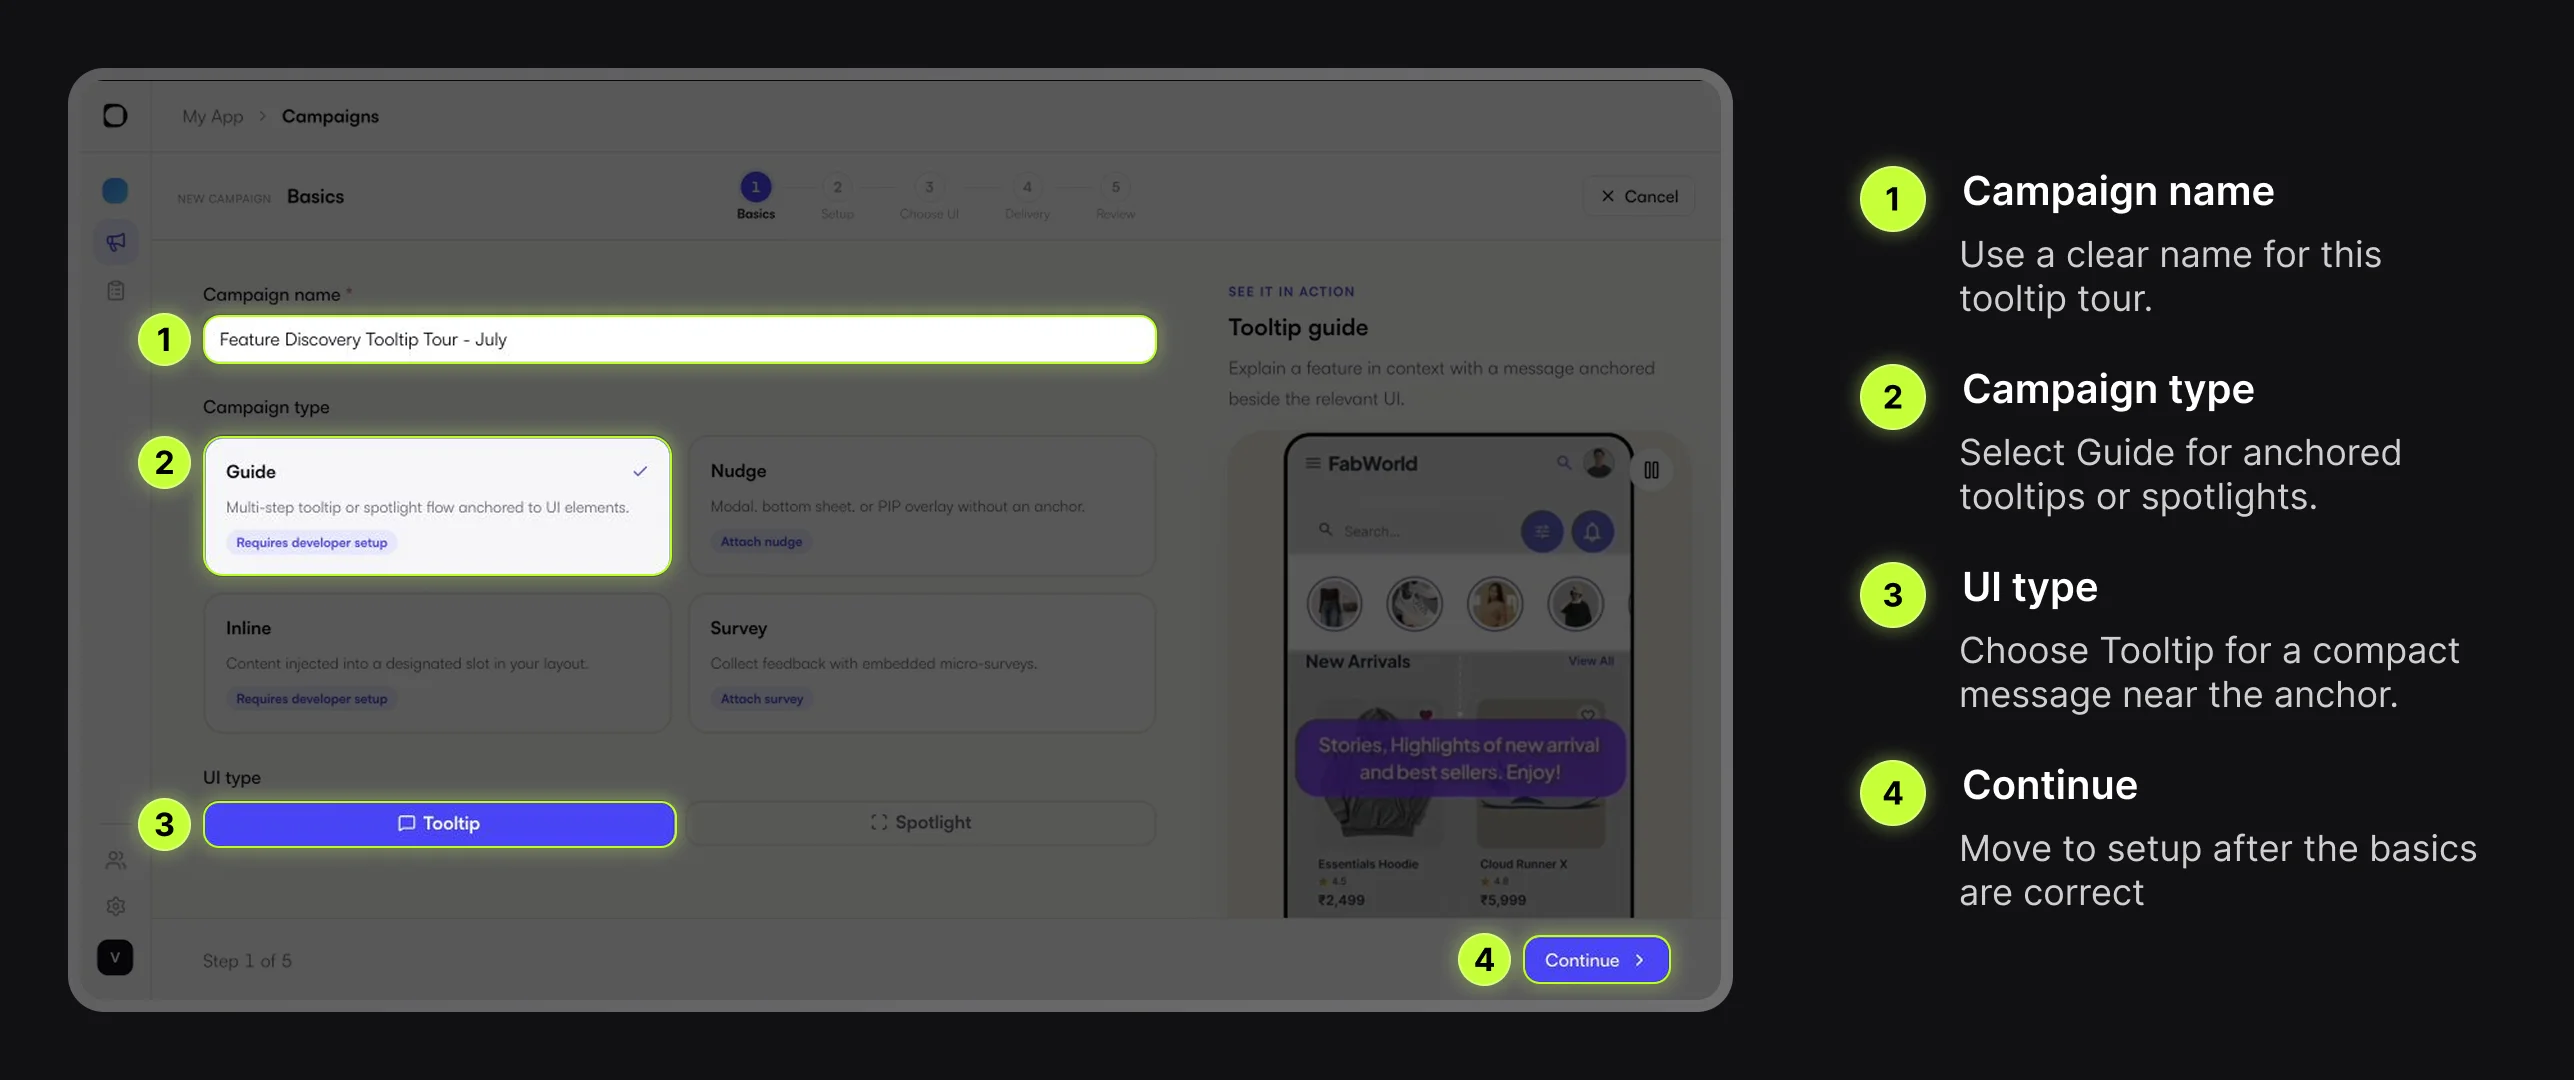
Go to Campaigns and choose New Campaign.
Use a name that your team can recognize later, such as:
Feature Discovery Tooltip Tour - July
On the Basics step, enter the campaign name, select Guide, choose Tooltip, and continue.
Confirm Setup Values
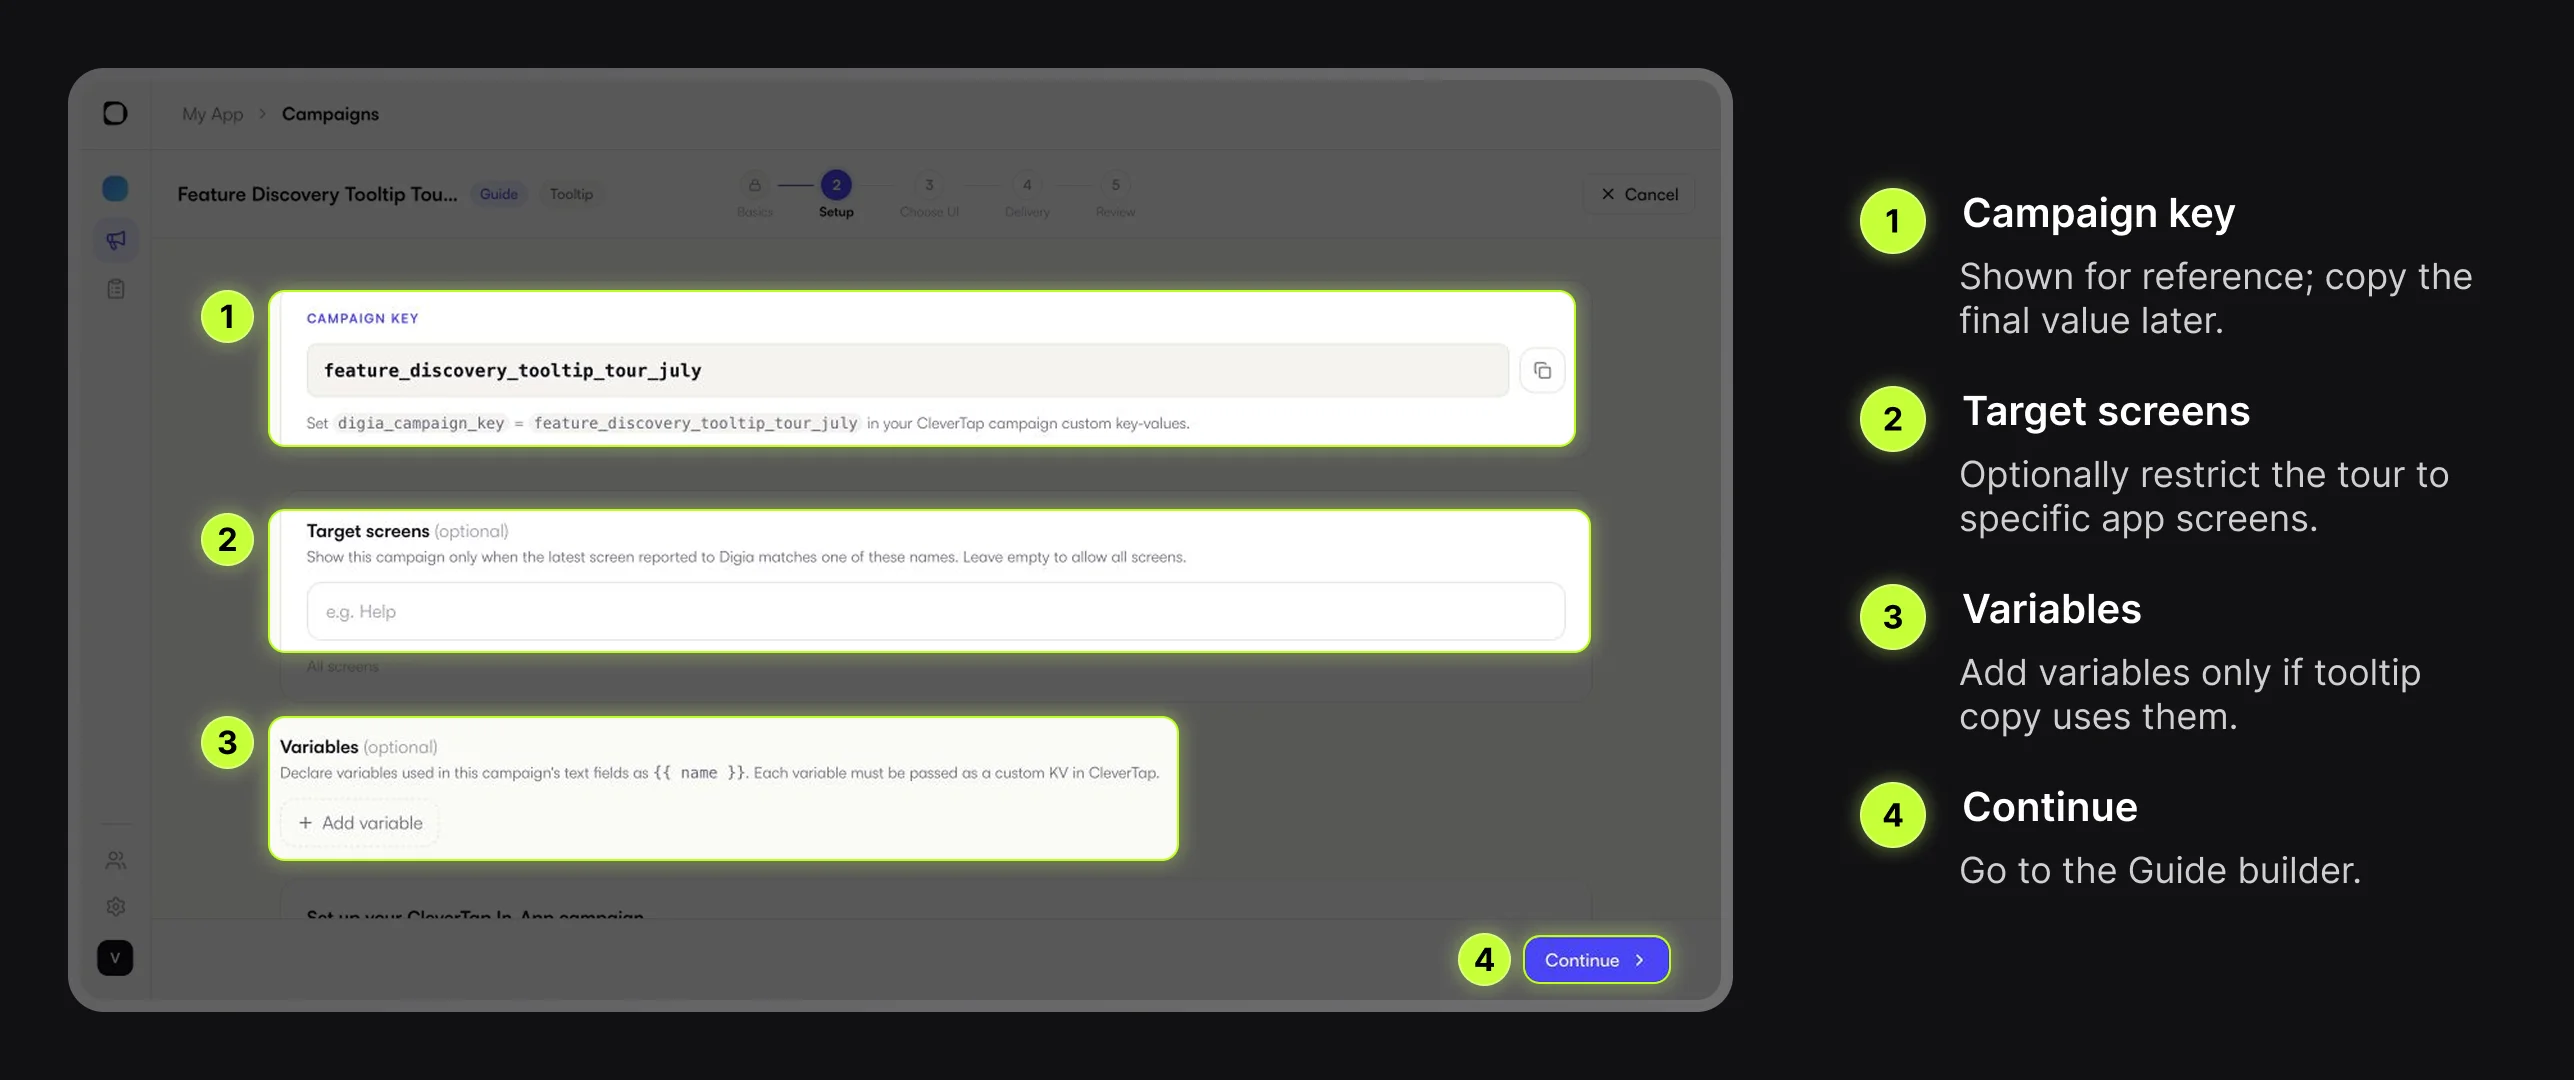
The Setup step shows the campaign key and optional targeting/variables.
Use Target screens only if the Guide should run on specific app screens. This can reduce failed anchors because the campaign fires only when Digia has reported a matching screen name.
Variables are optional. Add them only if the tooltip title, subtitle, or button copy uses dynamic values.
Design the Tooltip Steps
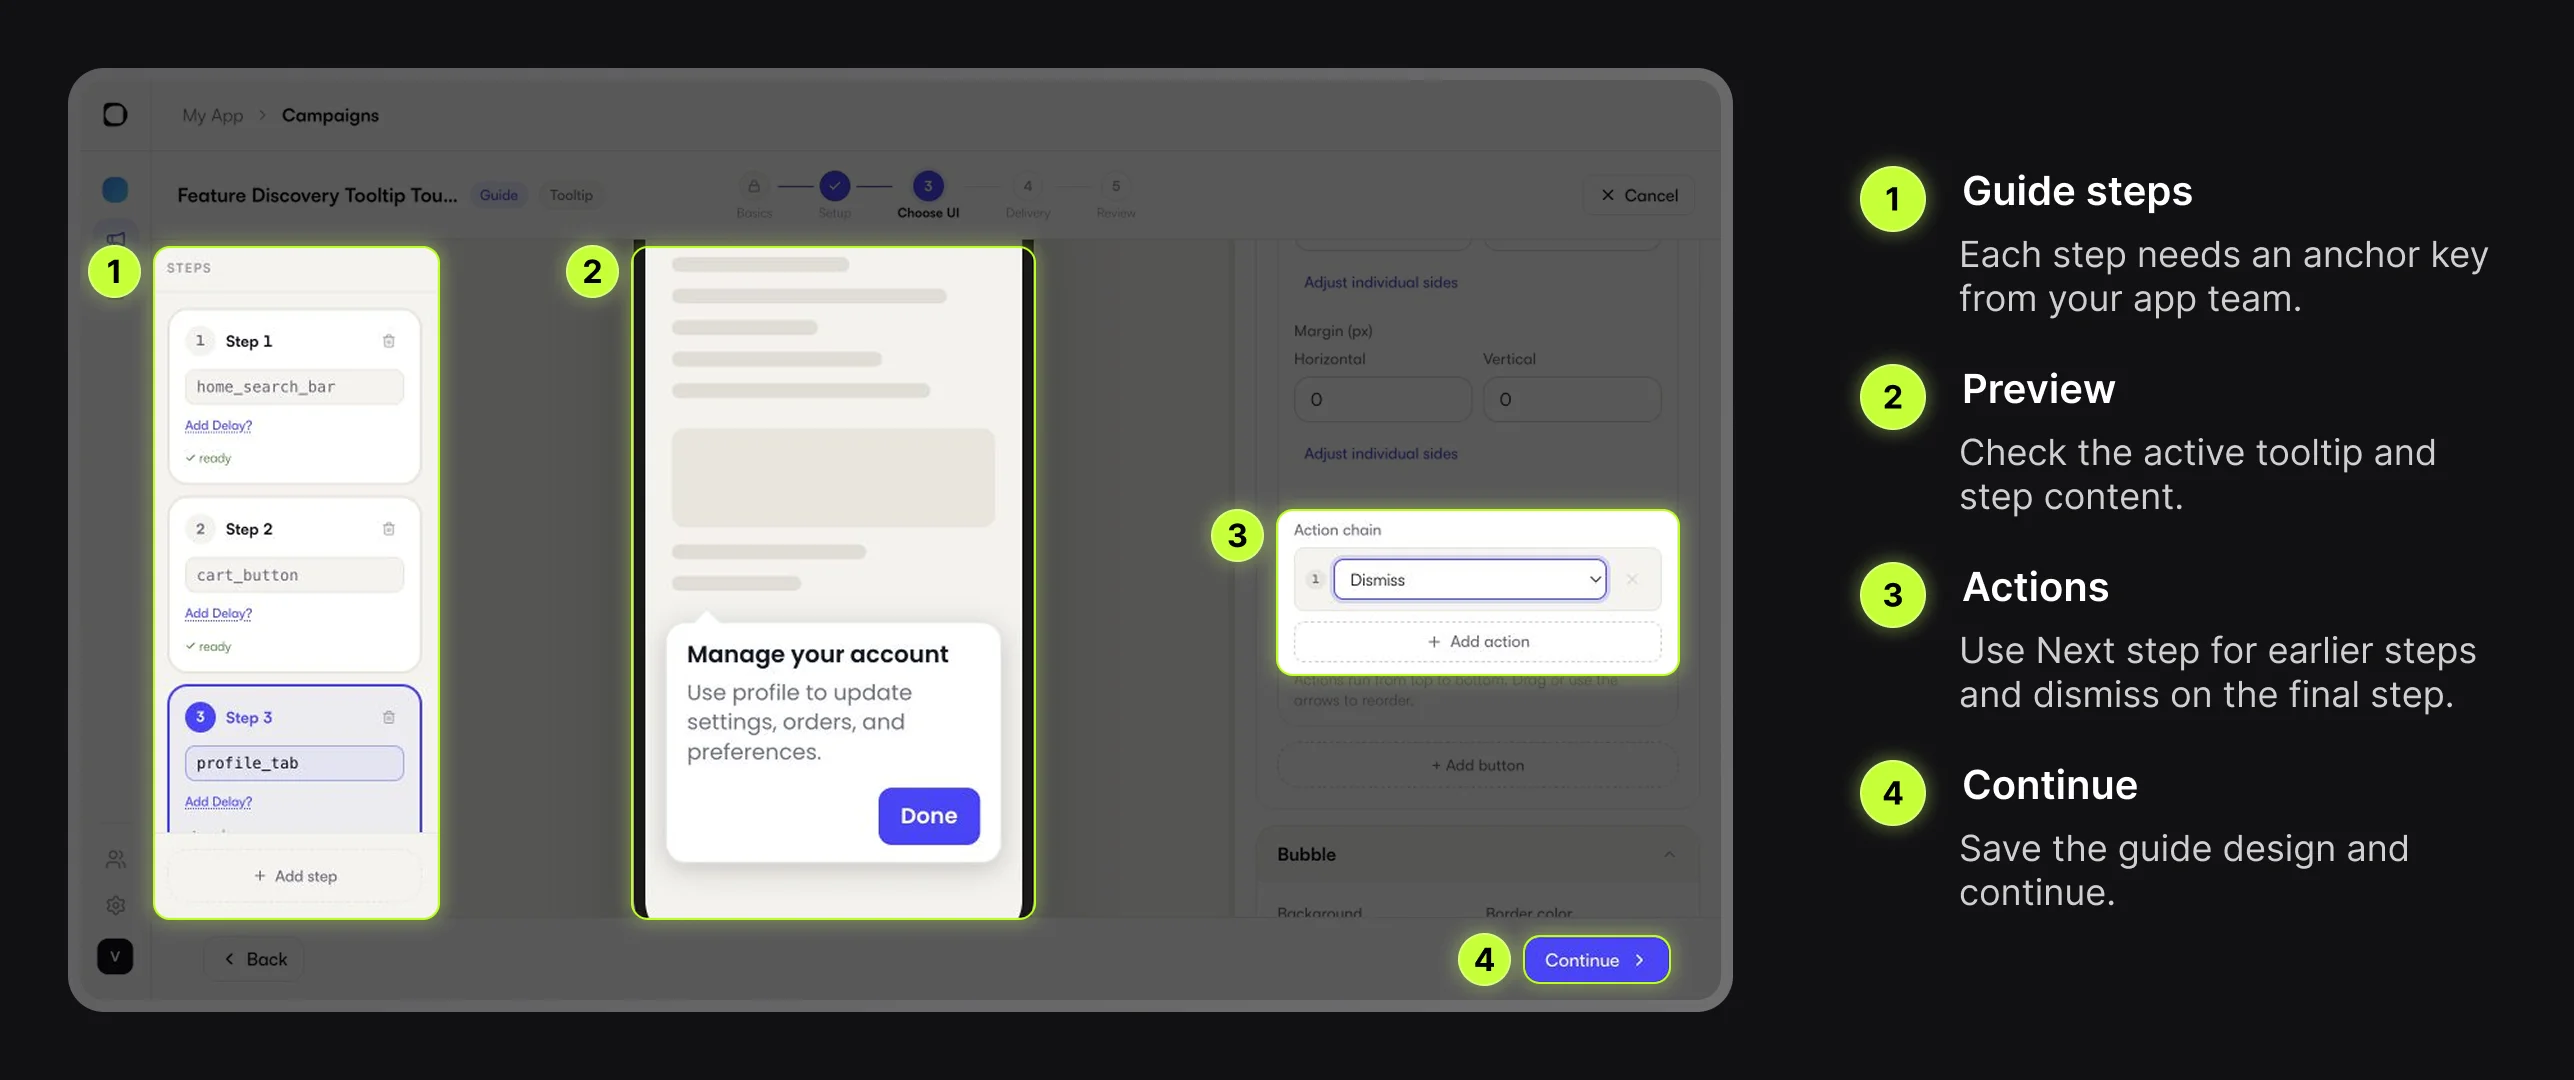
In the Guide builder, the left panel lists the steps in the tour. Each step needs an anchor key.
For each step:
- Enter the anchor key provided by your app team.
- Add a short title and subtitle.
- Check the preview.
- Set the button action. Earlier steps usually use Next step; the final step usually uses Dismiss.
Keep each tooltip short. Users should understand the message without losing context on the screen behind it.
Example step plan:
| Step | Anchor key | Tooltip copy |
|---|---|---|
| 1 | filter_button | Narrow the product list |
| 2 | cart_button | Review your cart |
| 3 | profile_tab | Manage your account |
Once the Guide UI is saved, use Live Testing Campaigns to send it to a connected debug device and confirm the tooltip copy, anchor keys, and step order before moving into delivery, review, and CleverTap setup.
Set Delivery Rules in Digia
On the Delivery step, choose how often Digia is allowed to show this Guide to the same user.
For onboarding tours, Until completed is usually a good starting point. It lets the Guide show again in a later session until the user finishes all steps.
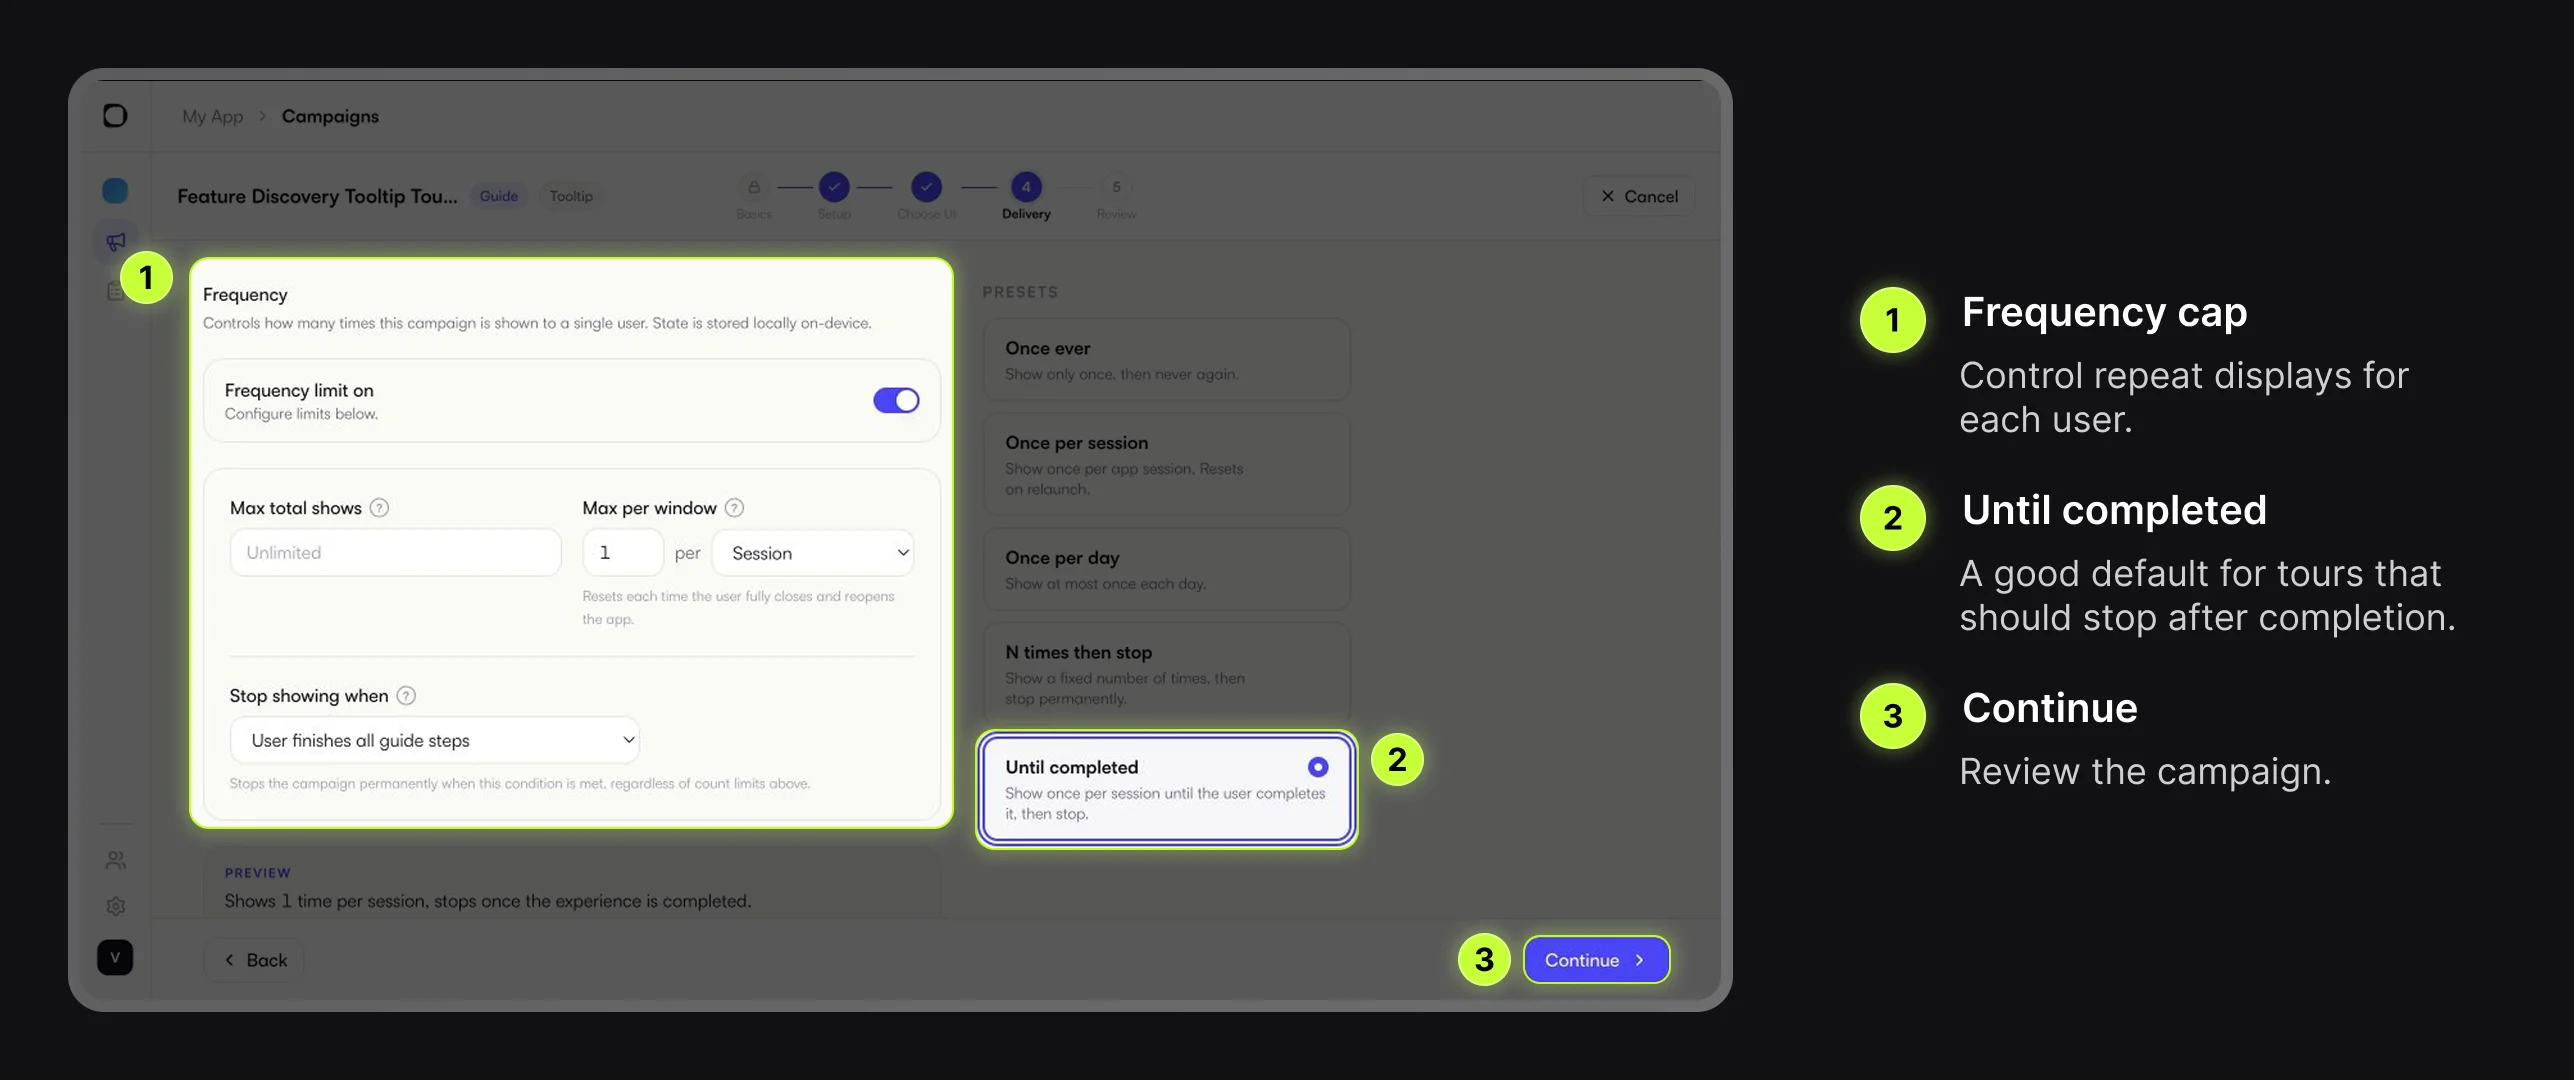
Common choices:
| Frequency cap | When to use it |
|---|---|
| Until completed | Multi-step onboarding or feature tours |
| Once ever | One-time announcements |
| Once per session | Repeated contextual education |
| Once per day | Reminders that should not appear too often |
CleverTap controls who qualifies and when the trigger happens. Digia controls whether the Guide should still render after CleverTap fires.
Review and Copy CleverTap Config
On the Review step, check:
- The campaign name is correct.
- The campaign type is Guide.
- The UI type is Tooltip.
- Every step has an anchor key.
- The frequency cap matches your campaign plan.
You can save as draft while CleverTap setup is still pending, or activate when the Guide is ready. Nothing shows to your users until the CleverTap campaign is configured and live.
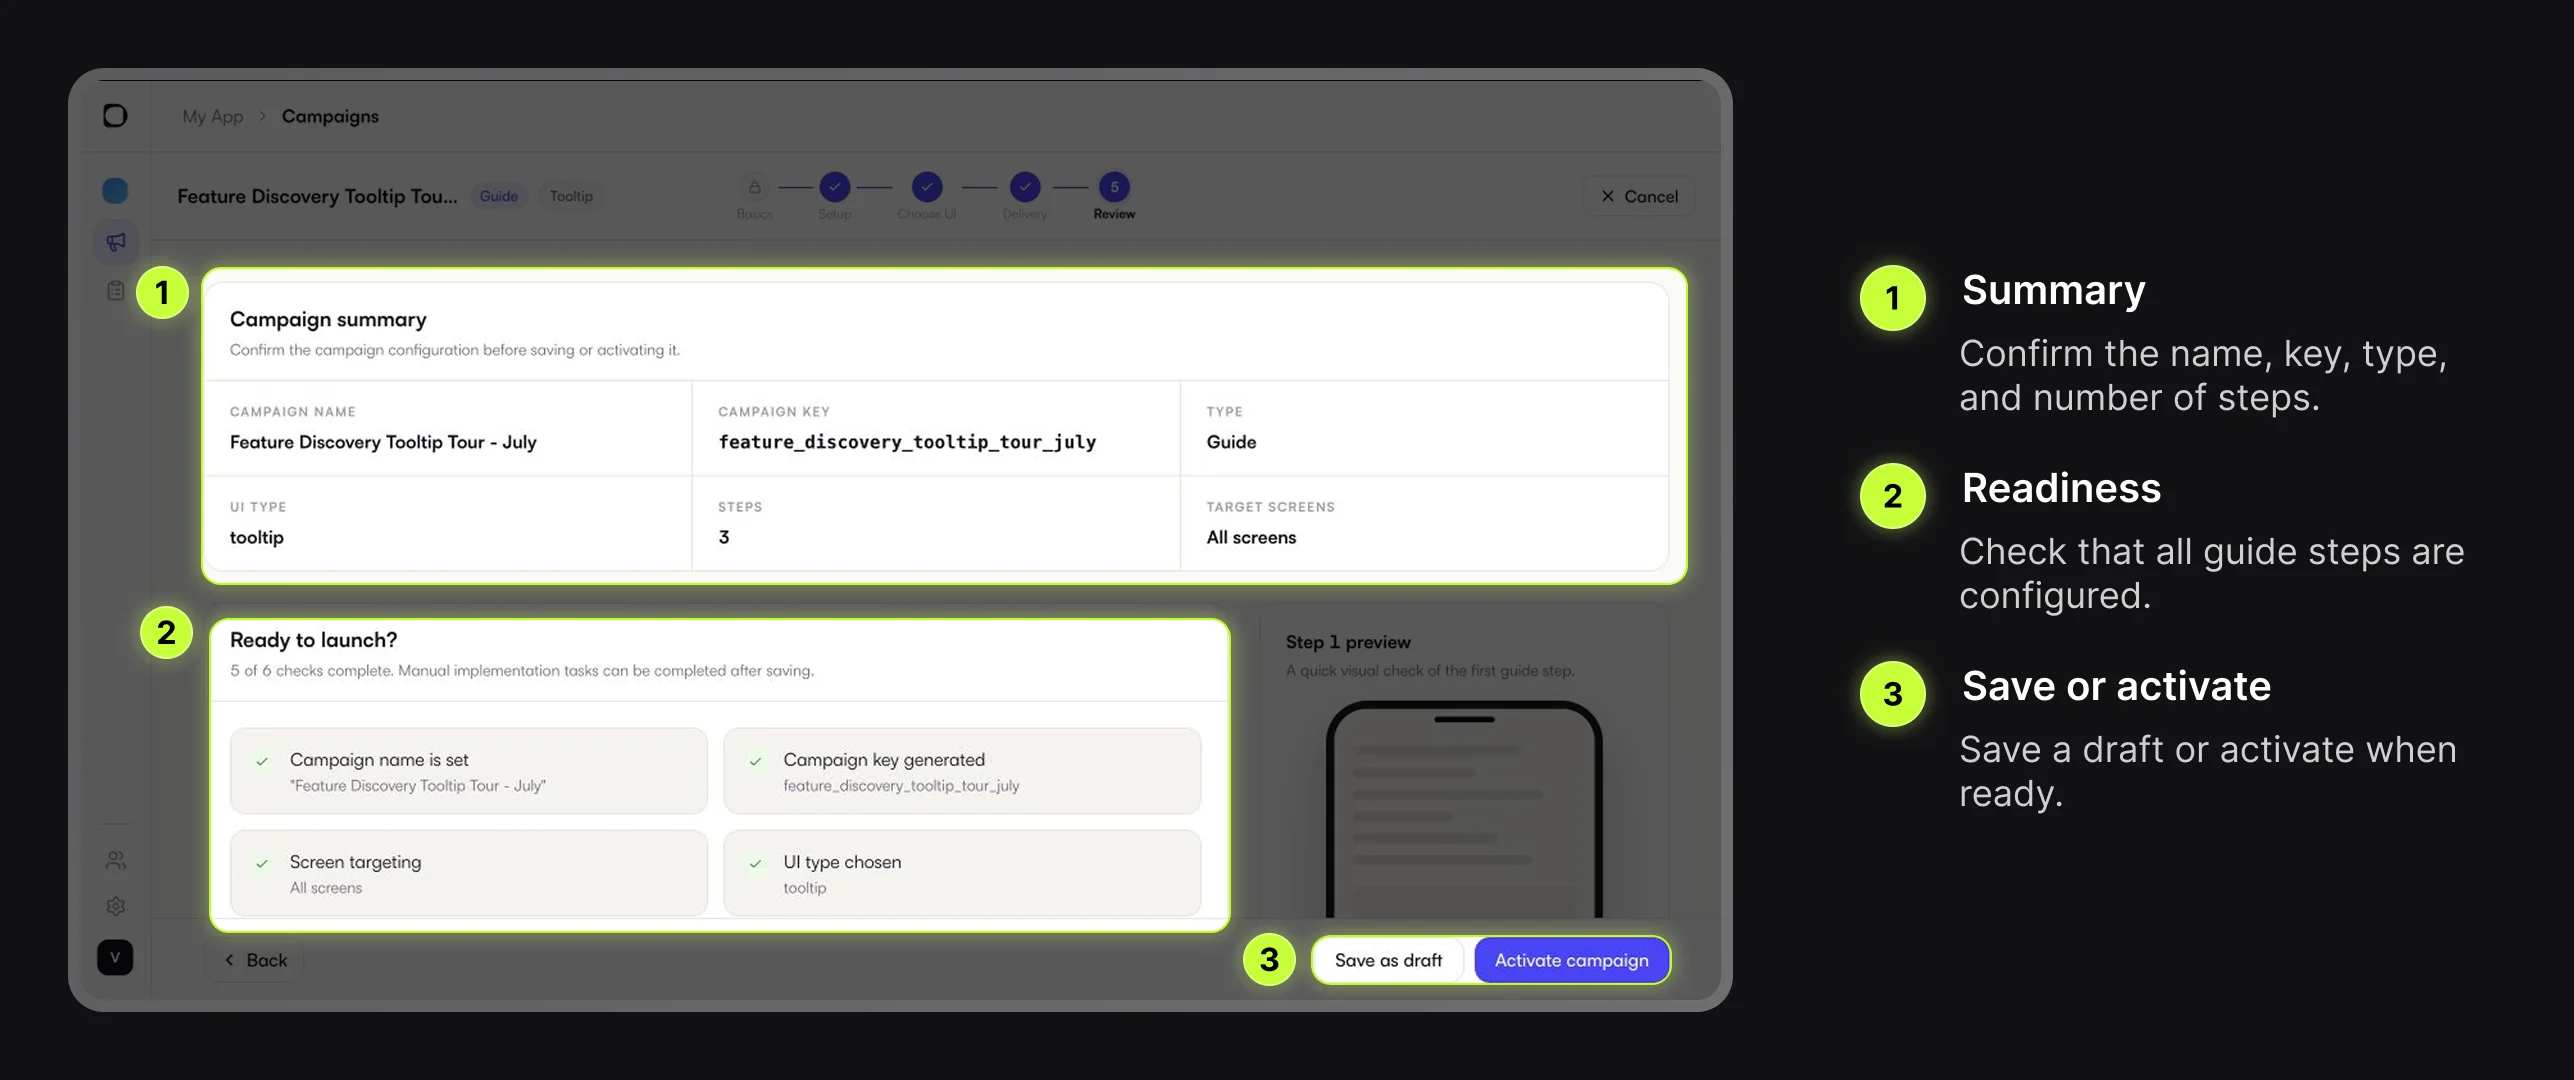
After reviewing, scroll to Set up your CleverTap In-App campaign. Copy the campaign key and variables config from that section. You will paste those values into the CleverTap DigiaTemplate.
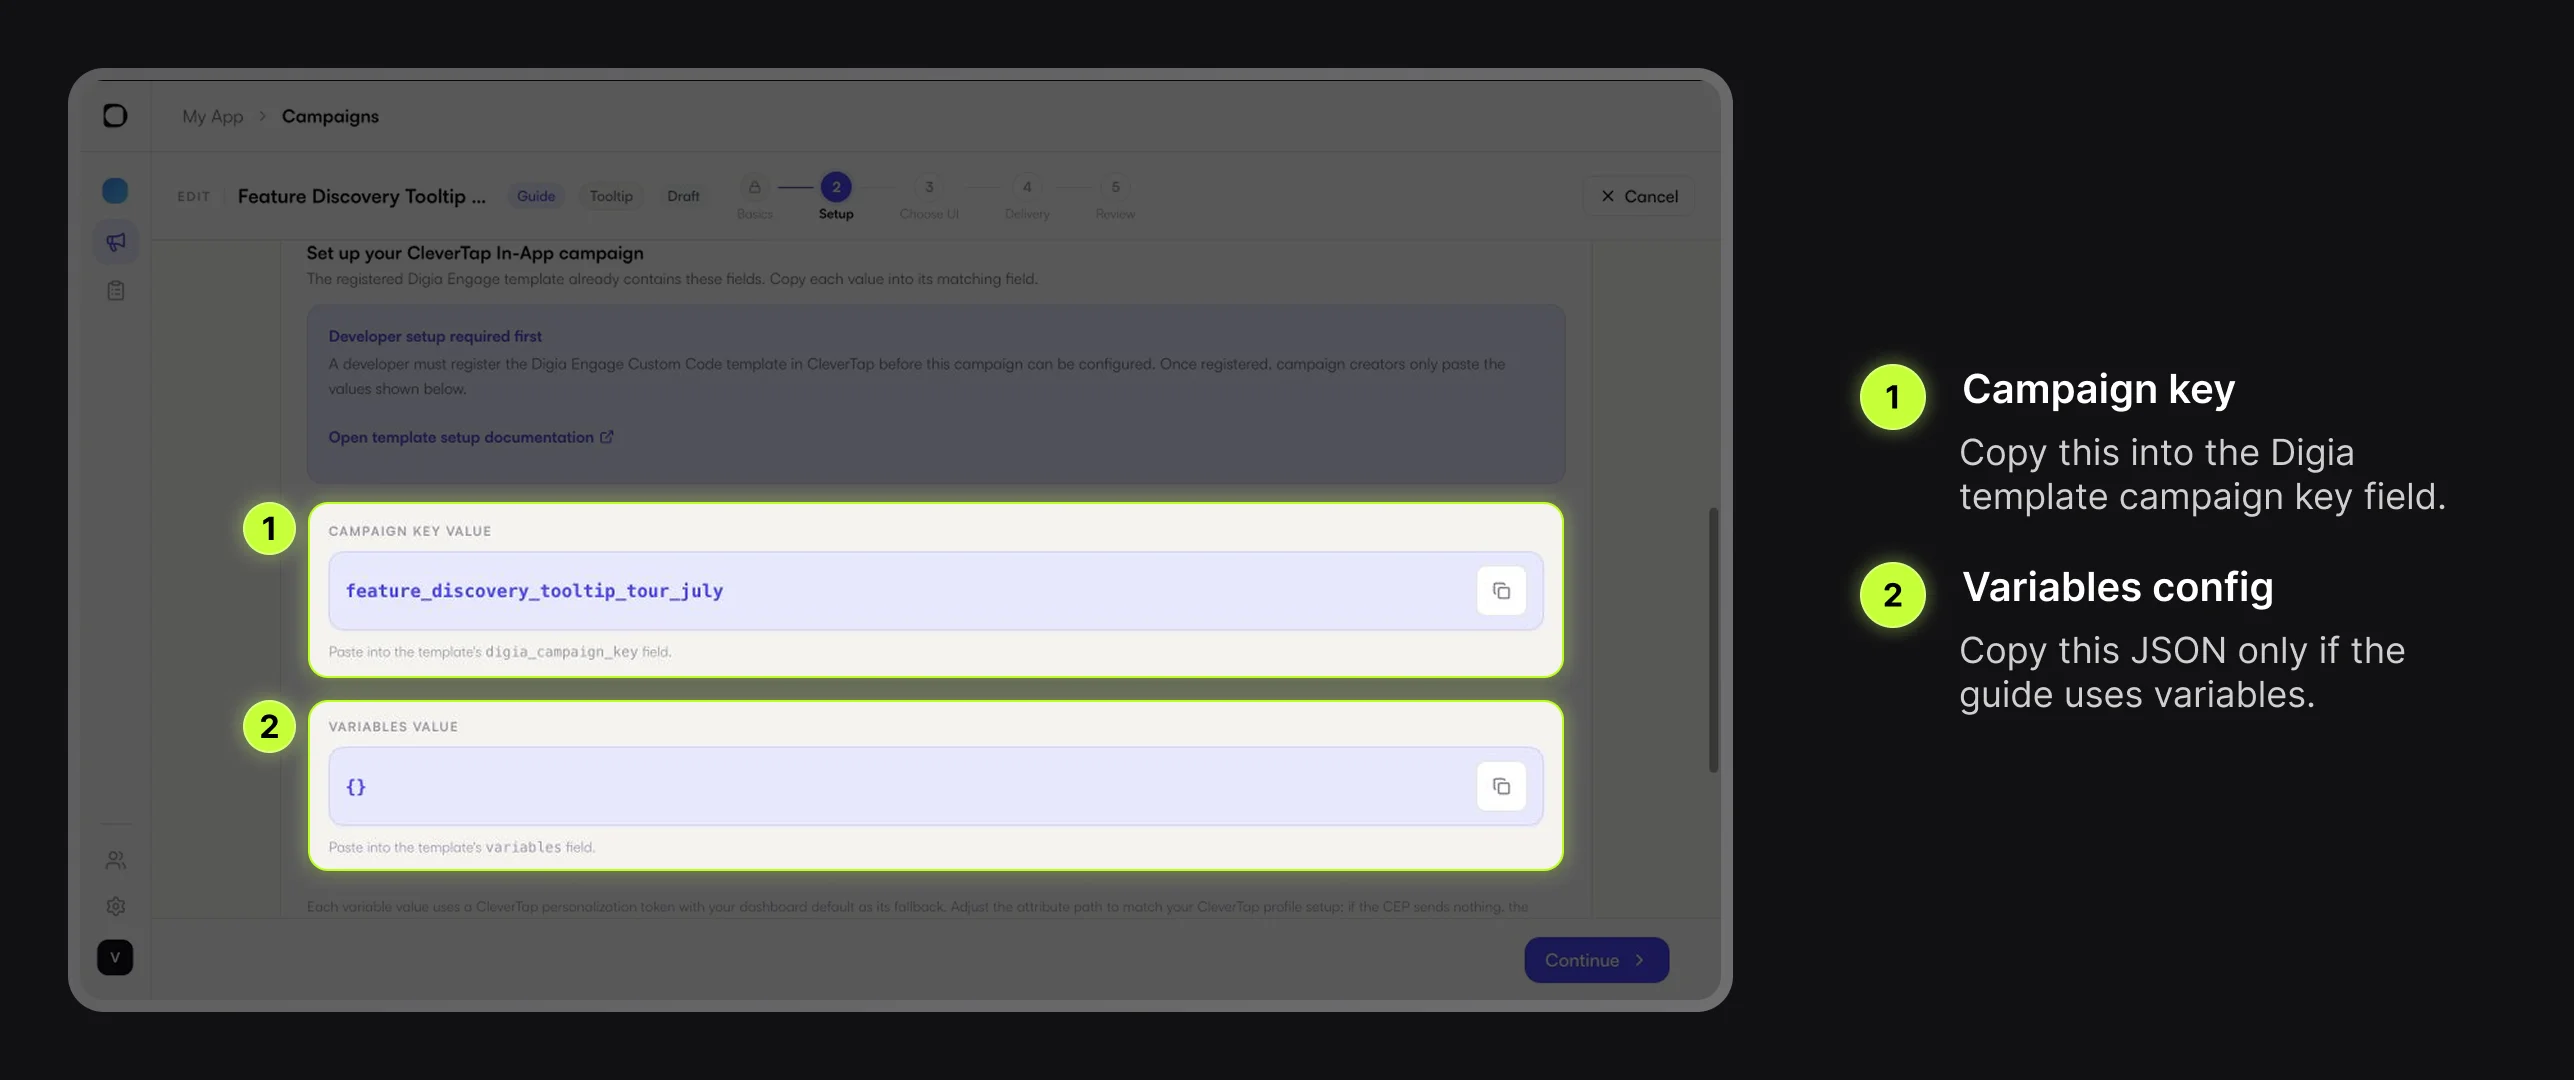
Create the CleverTap In-App Campaign
Now switch to CleverTap. This is where you decide who should see the Guide and when it should appear.
Create an In-App campaign. Configure the audience, trigger, schedule, and priority as you normally would in CleverTap. For the first test, keep the audience narrow so only your test users qualify.
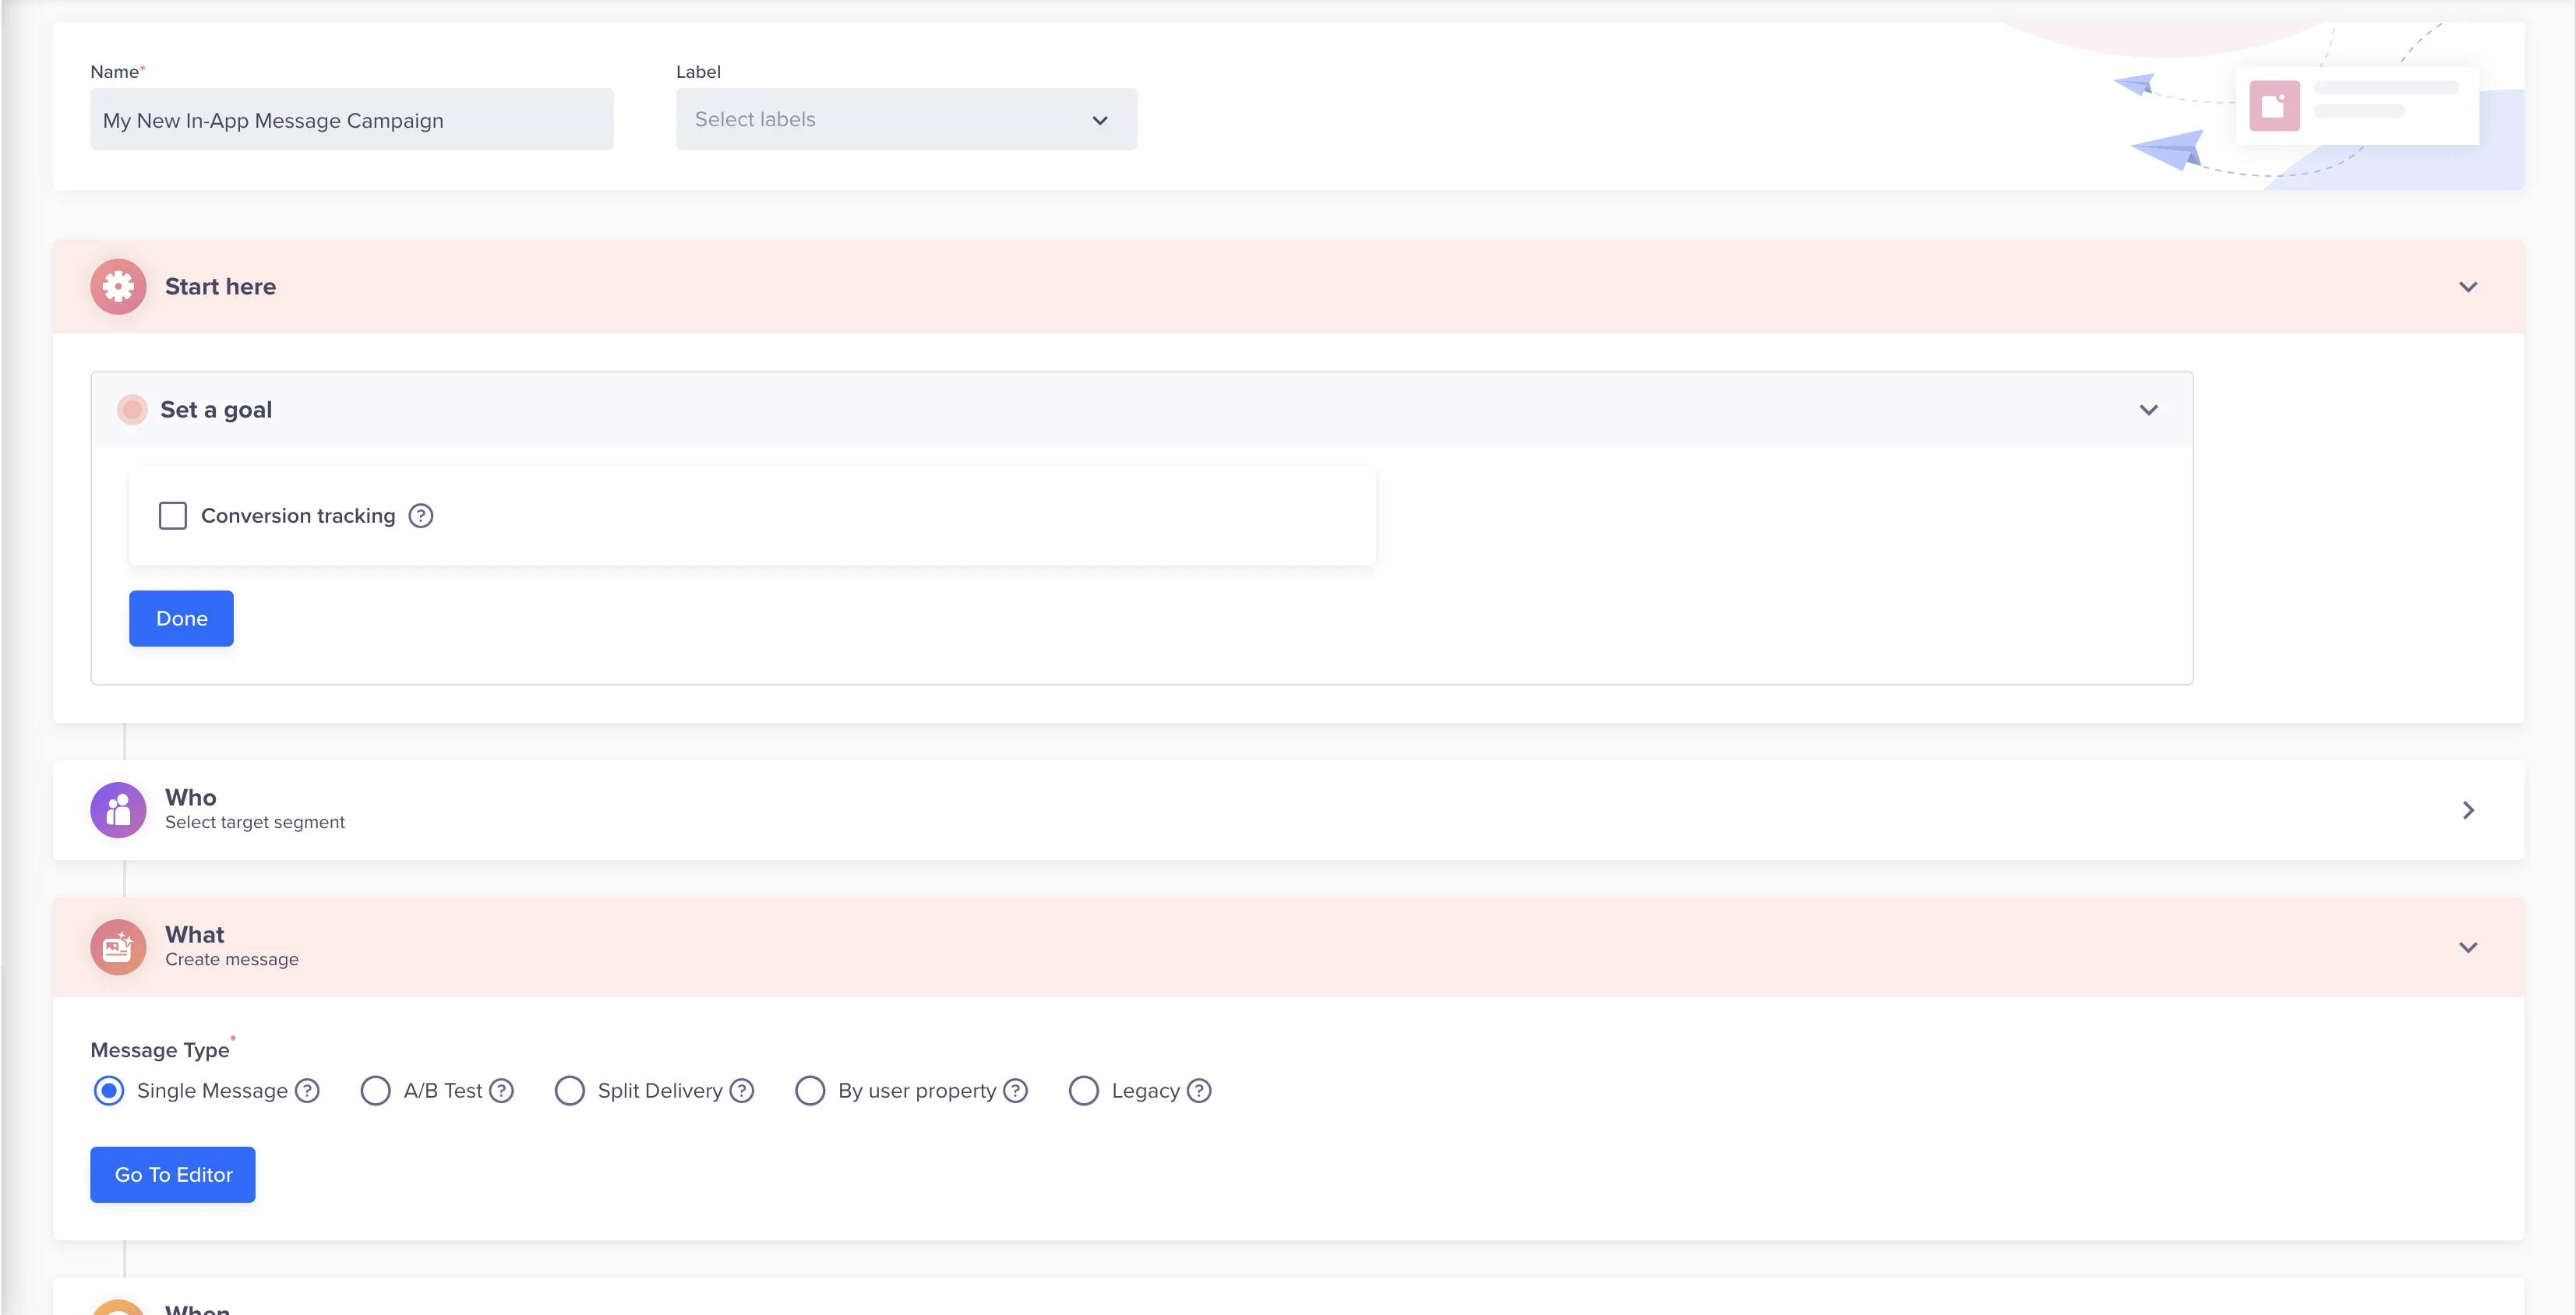
In CleverTap's What section, keep the message type set to Single Message and select Go To Editor. In the editor, switch to Custom Code Templates and choose DigiaTemplate.
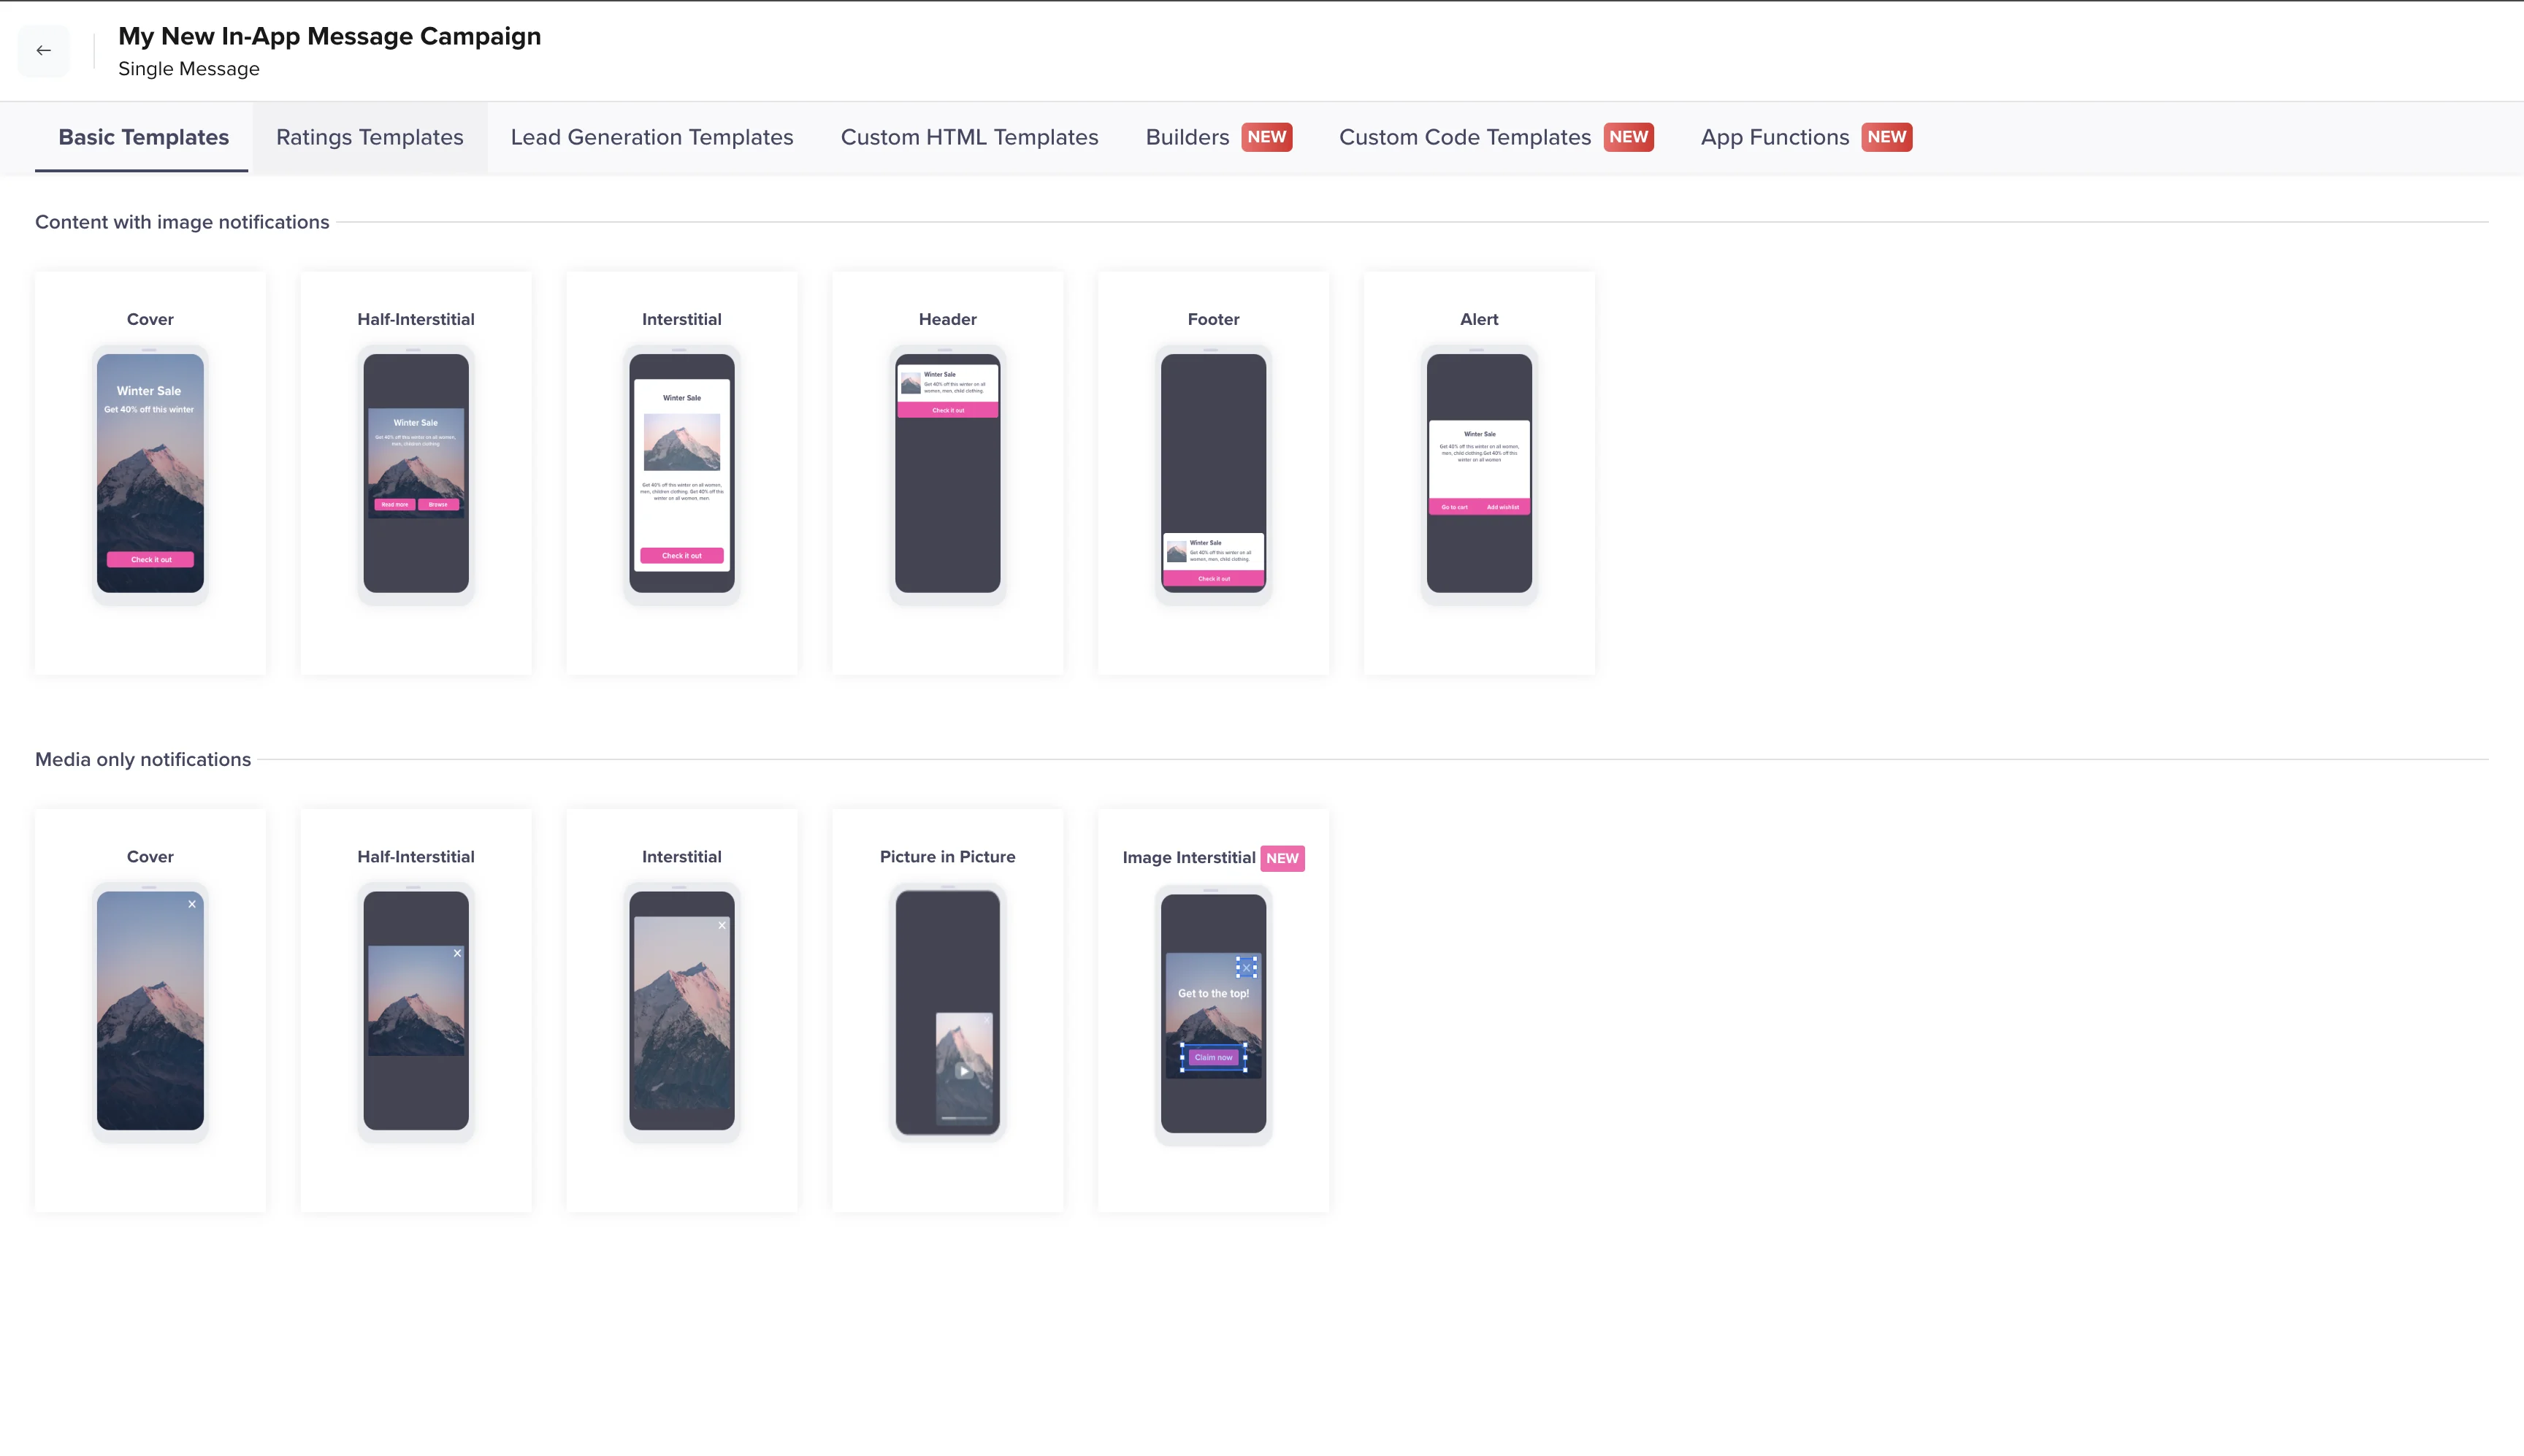
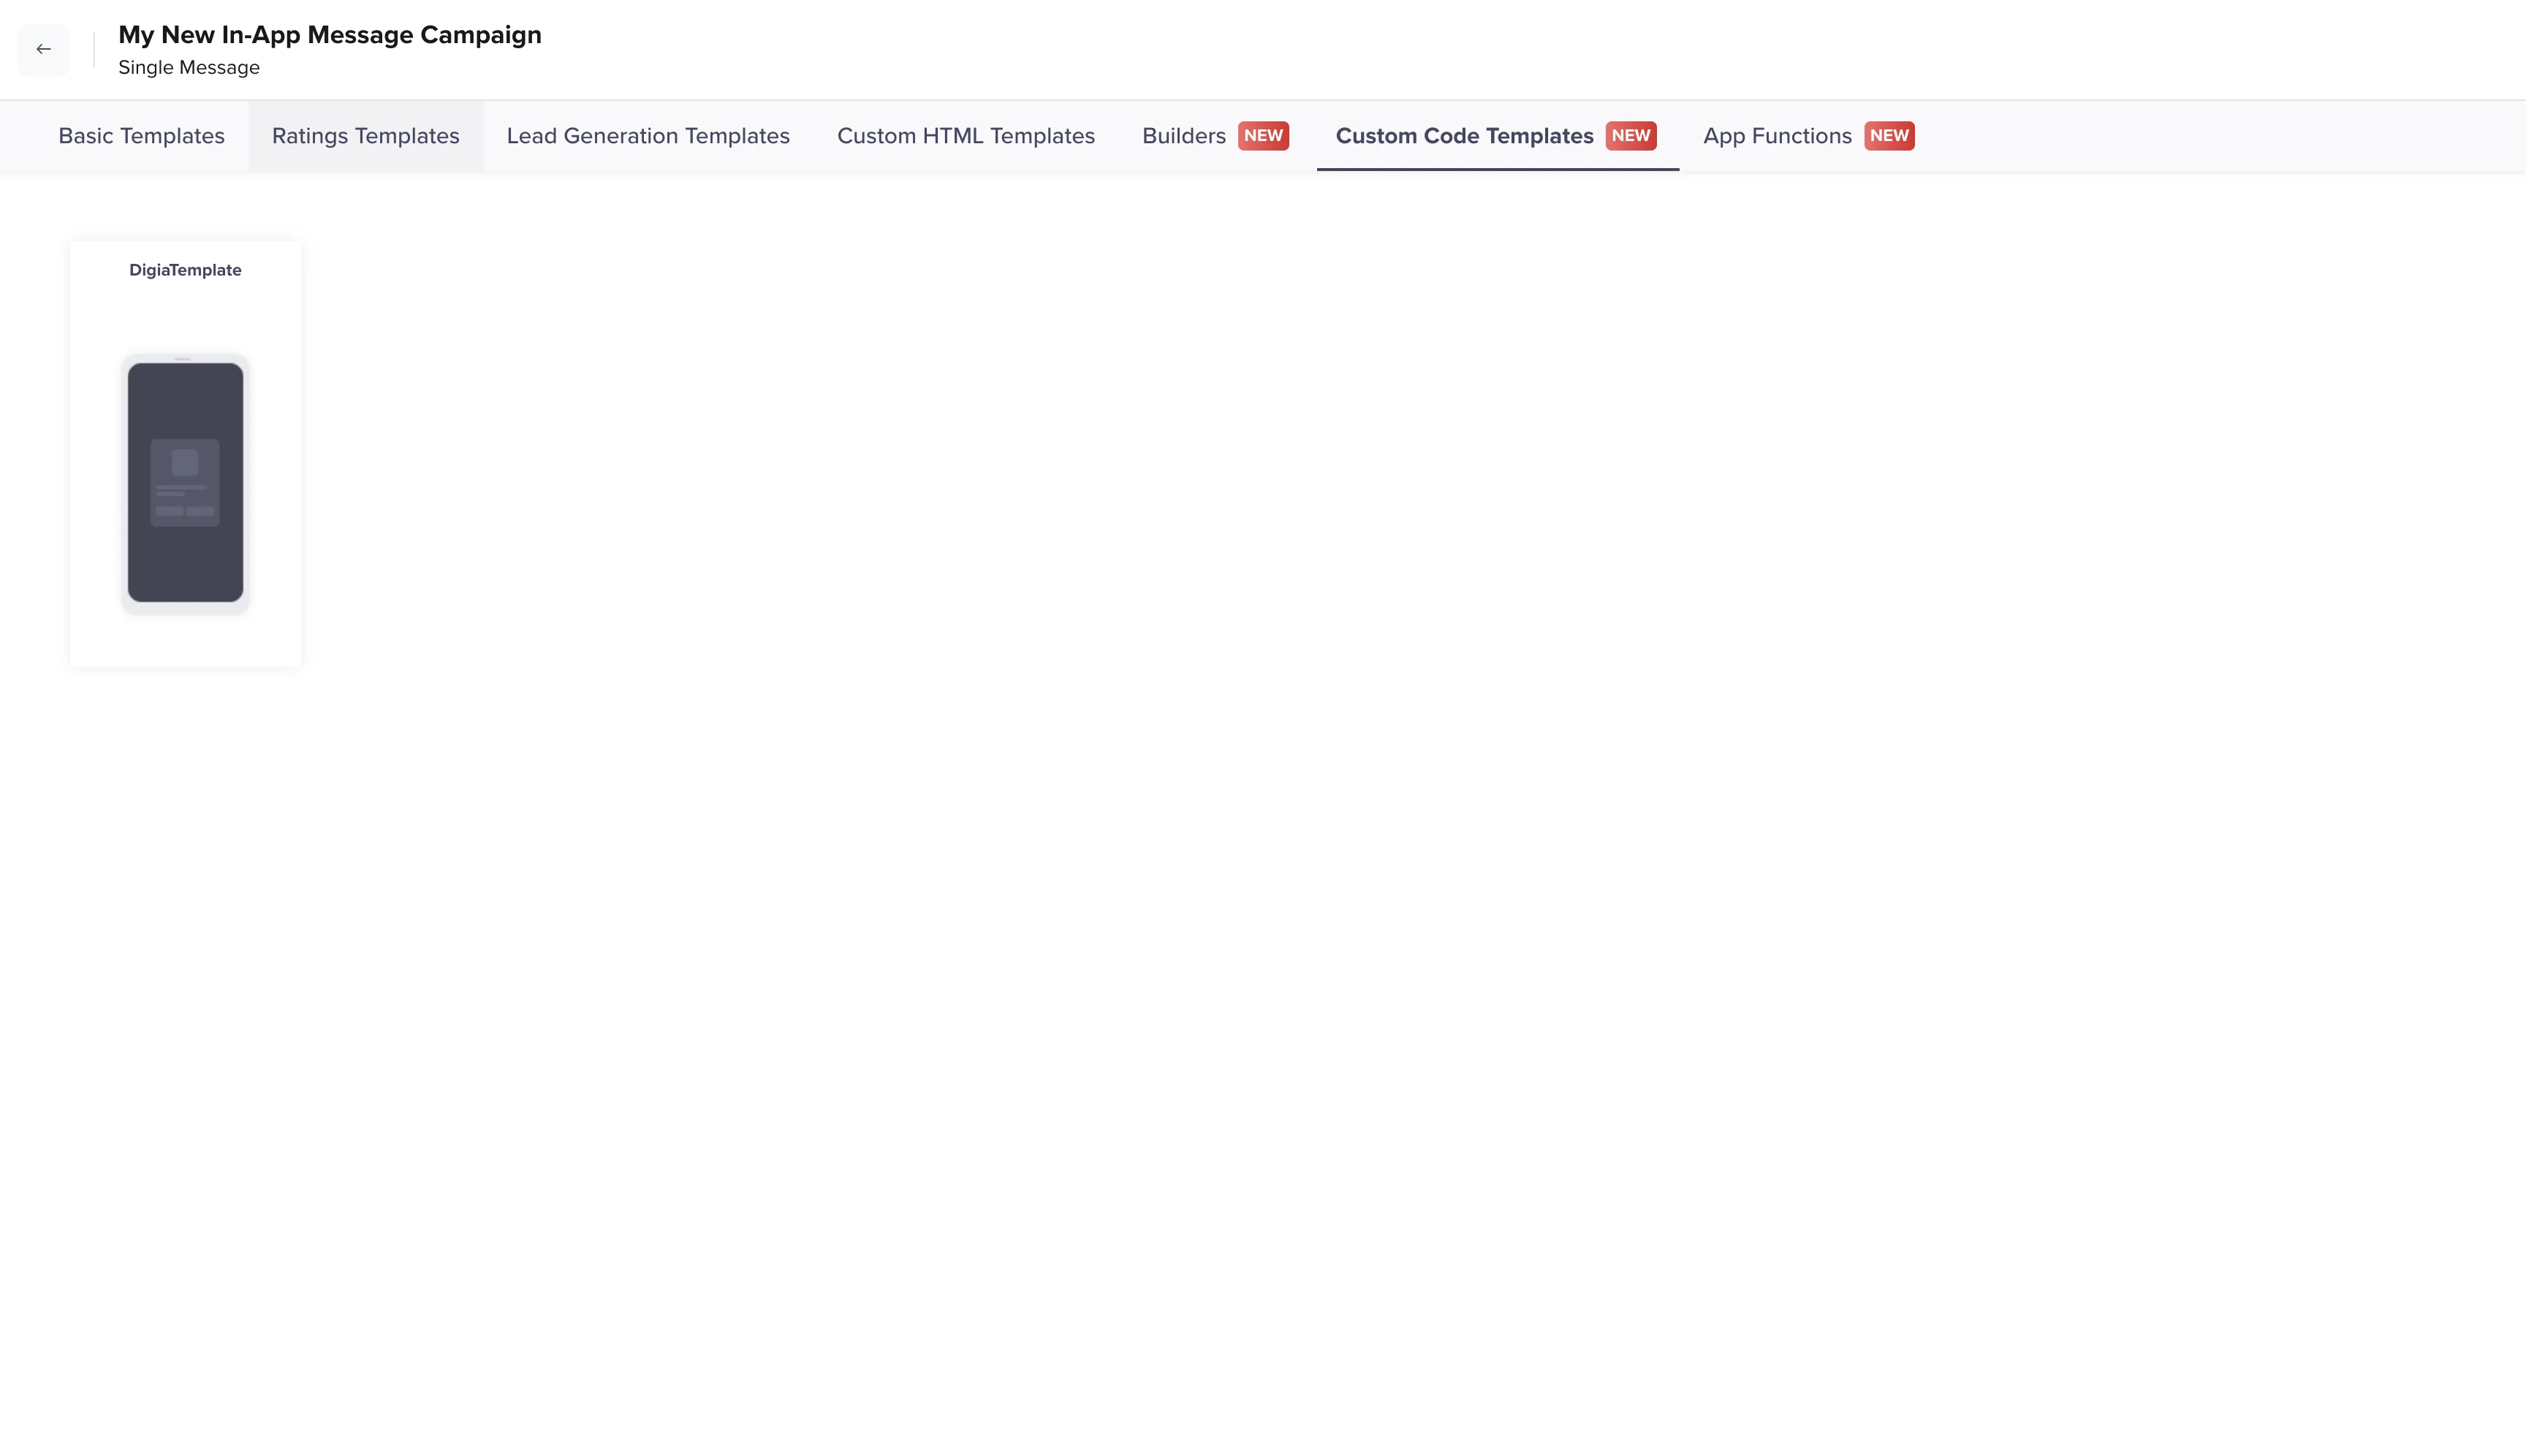
If you do not see DigiaTemplate, your developer team has not completed the one-time CleverTap template setup. Share the CleverTap developer integration guide with them before continuing.
Link CleverTap to the Digia Guide
In the CleverTap campaign message/template step, set the Digia campaign key.
Add:
| Field | Value |
|---|---|
digia_campaign_key | The campaign key copied from Digia |
If your Guide uses variables, also pass them from CleverTap.
Use the variables config copied from Digia as the starting point. Replace profile paths only if your CleverTap project stores these values under different user properties.
{}
If your Guide has variables, the JSON may look like:
{
  "first_name": "{{Profile.first_name | default:'there'}}"
}
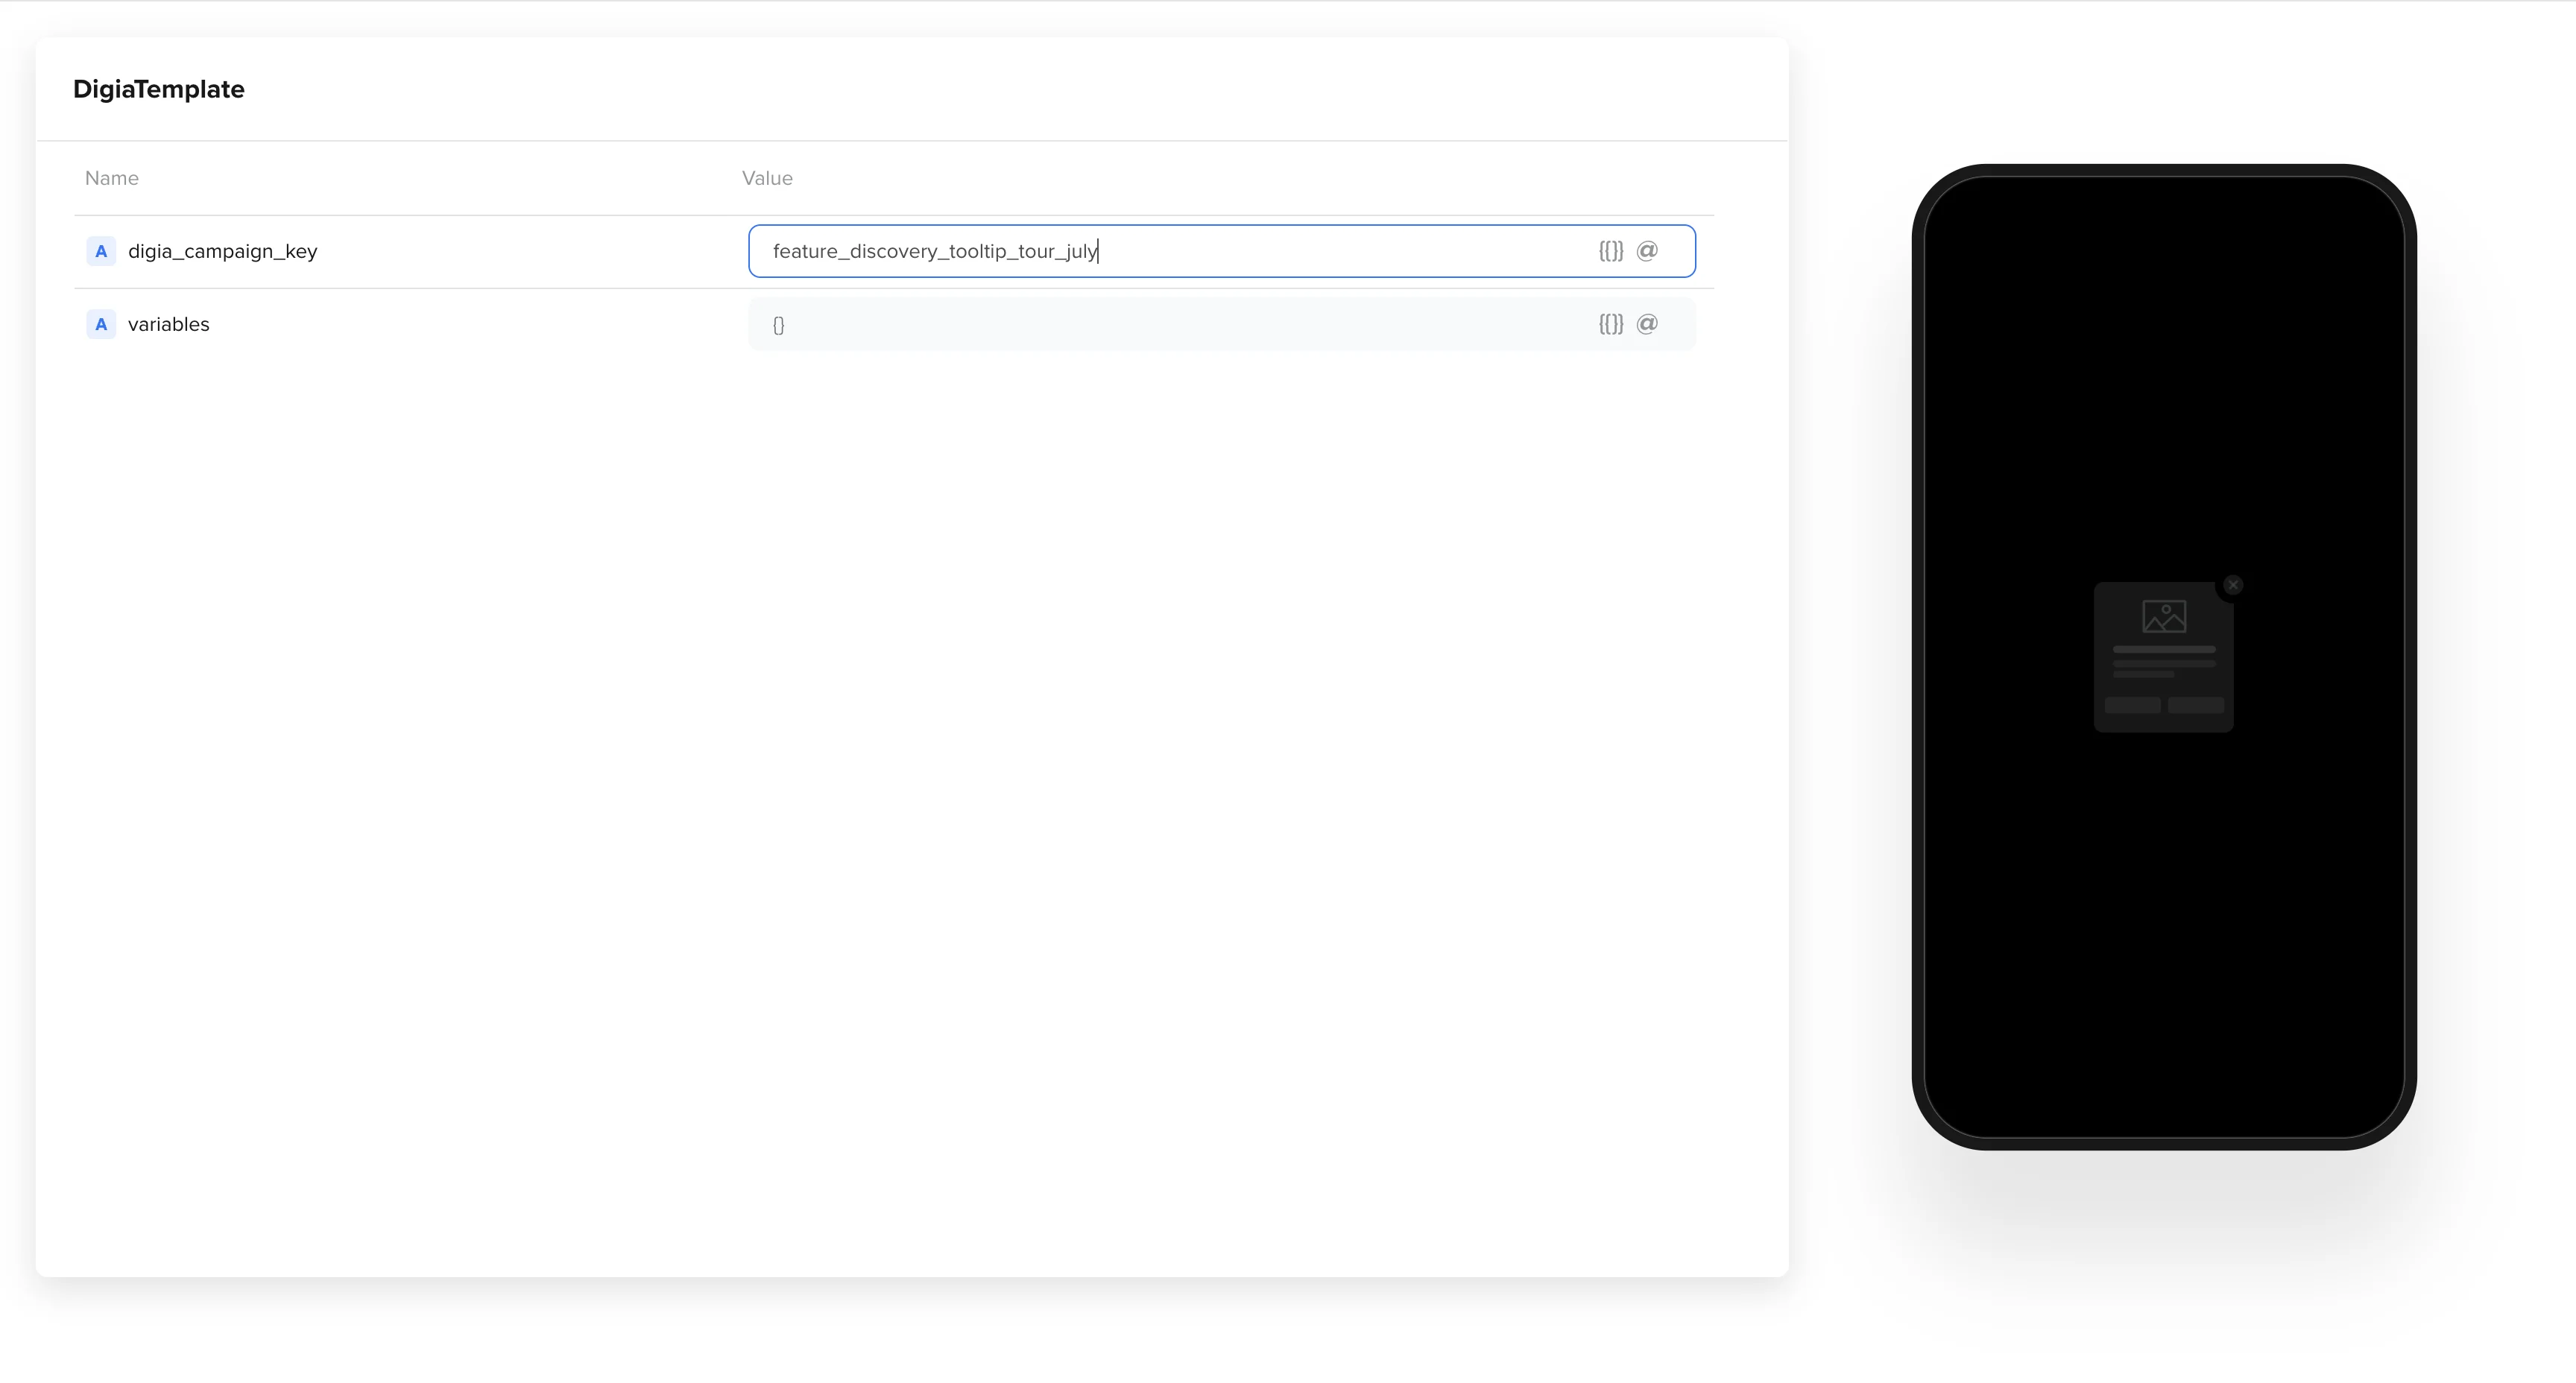
Keep the Guide steps, copy, and anchor keys in Digia. CleverTap should only carry the campaign key and optional variables.
Test the Guide End to End
Before launching to a real audience, test the full path from CleverTap trigger to Digia render:
- Use a test audience in CleverTap.
- Activate or preview the CleverTap campaign for that test audience.
- Open the app screen that contains the first anchor key.
- Trigger the CleverTap event from a test device.
- Confirm the first tooltip attaches to the correct UI element.
- Move through all steps and confirm each one anchors correctly.
- Complete or dismiss the Guide and confirm the frequency cap behaves as expected.
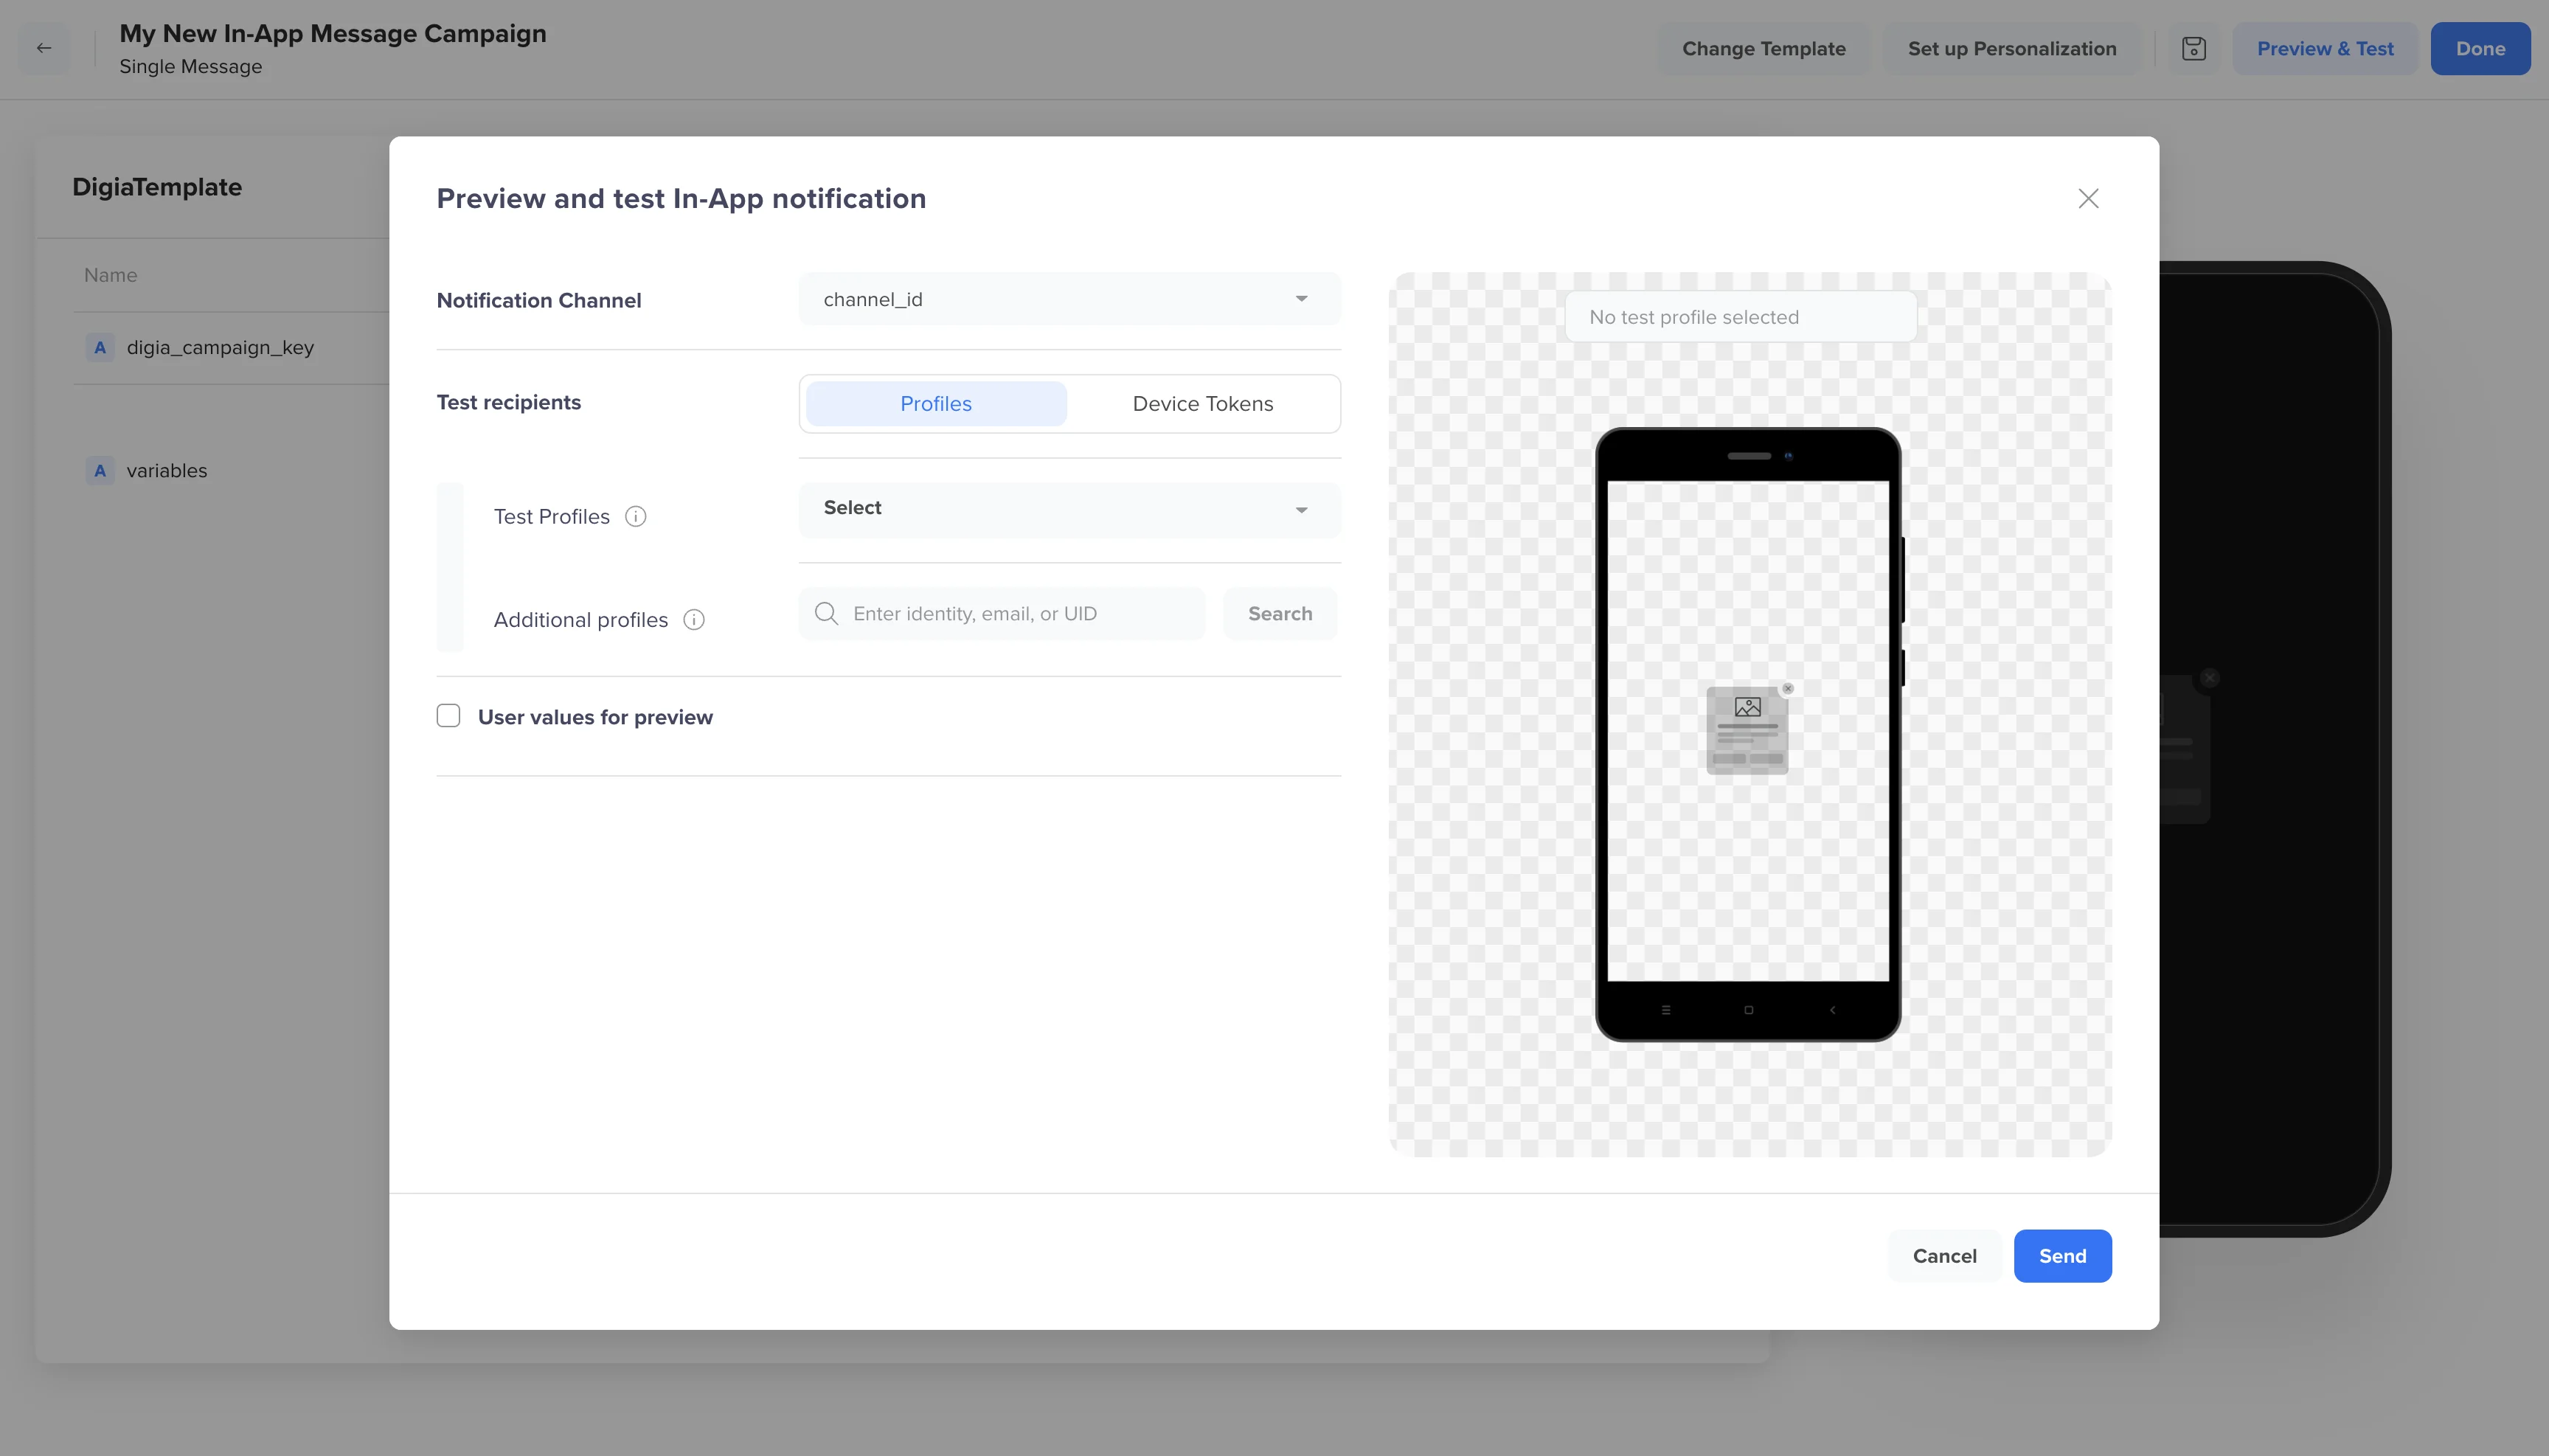
If the Guide does not appear, check:
| What to check | Why it matters |
|---|---|
| The Digia campaign is active | Draft campaigns will not render for users |
digia_campaign_key matches exactly | The key is case-sensitive |
| DigiaTemplate is available in CleverTap | The In-App campaign must use the registered template |
| The user qualifies in CleverTap | CleverTap owns audience and trigger rules |
| The trigger event fired | CleverTap only sends the campaign after its trigger |
| The first anchor key is on screen | Guides need the target UI element to be mounted |
| Anchor keys match exactly | A typo prevents the tooltip from attaching |
| Frequency cap has not already been reached | Digia may suppress repeat renders |
CleverTap can sometimes take up to an hour to start delivering a new campaign. If the campaign still does not appear after that, reach out to Digia support.
Launch Checklist
Before going live, confirm:
- Digia campaign is active.
- CleverTap campaign uses DigiaTemplate.
digia_campaign_keymatches the Digia campaign key.- Every Guide step has a valid anchor key.
- The first anchor is present when the CleverTap trigger fires.
- Variables are valid JSON, if used.
- Audience and trigger rules are correct in CleverTap.
- Frequency cap is set in Digia.
- The campaign was tested on at least one real device.
Once these are complete, schedule or activate the CleverTap campaign for the intended audience.
Recap
- Create a Guide campaign in Digia.
- Choose Tooltip as the UI type.
- Add one step per tooltip and map every step to an anchor key.
- Set delivery rules, usually Until completed for tours.
- Copy the campaign key and variables config from Digia.
- Create a CleverTap In-App campaign using
DigiaTemplate. - Paste the key as
digia_campaign_key. - Test on a real device before launch.
For the technical mapping between Digia and CleverTap, see How Digia Maps to CleverTap Campaigns.