Bottom-Sheet Nudge with WebEngage
This guide walks you through creating a bottom-sheet Nudge in Digia Engage, connecting it to WebEngage, and testing it on a device. By the end, you should have a designed Nudge in Digia, a WebEngage campaign that points to it, and a test device where you can verify the experience.
Use a bottom sheet when you want a contextual overlay, such as an offer, announcement, setup reminder, or rating prompt. Dialog Nudges follow the same flow; choose a dialog layout in the builder instead of a bottom sheet.
Prefer a quick visual walkthrough first? Watch Creating Native Nudge Campaigns Without App Releases.
Before You Start
Make sure you have:
- Access to the correct Digia Engage project created with WebEngage as the CEP integration.
- Access to the matching WebEngage project.
- Your app must already be integrated with Digia Engage and WebEngage. Share the WebEngage developer integration guide with your app team if this setup is not complete yet.
- The audience and trigger event decided in WebEngage.
- If you plan to target specific app screens, review usable pages in Component Registry.
- A test profile or test segment in WebEngage so you can verify the campaign before launch.
- Any content ready: headline, body copy, image URL, CTA text, deep link, coupon code, or offer details.
This guide is written for product managers and marketers. Developer-only setup is linked above so you know what must already be complete before campaign testing.
If you plan to personalize the Nudge, decide the variables before you build.
| Variable | Example value | Used for |
|---|---|---|
coupon | SAVE20 | Button copy or offer copy |
first_name | Aarav | Personalized greeting |
expiry_time | 4 PM | Urgency text |
Create a New Campaign
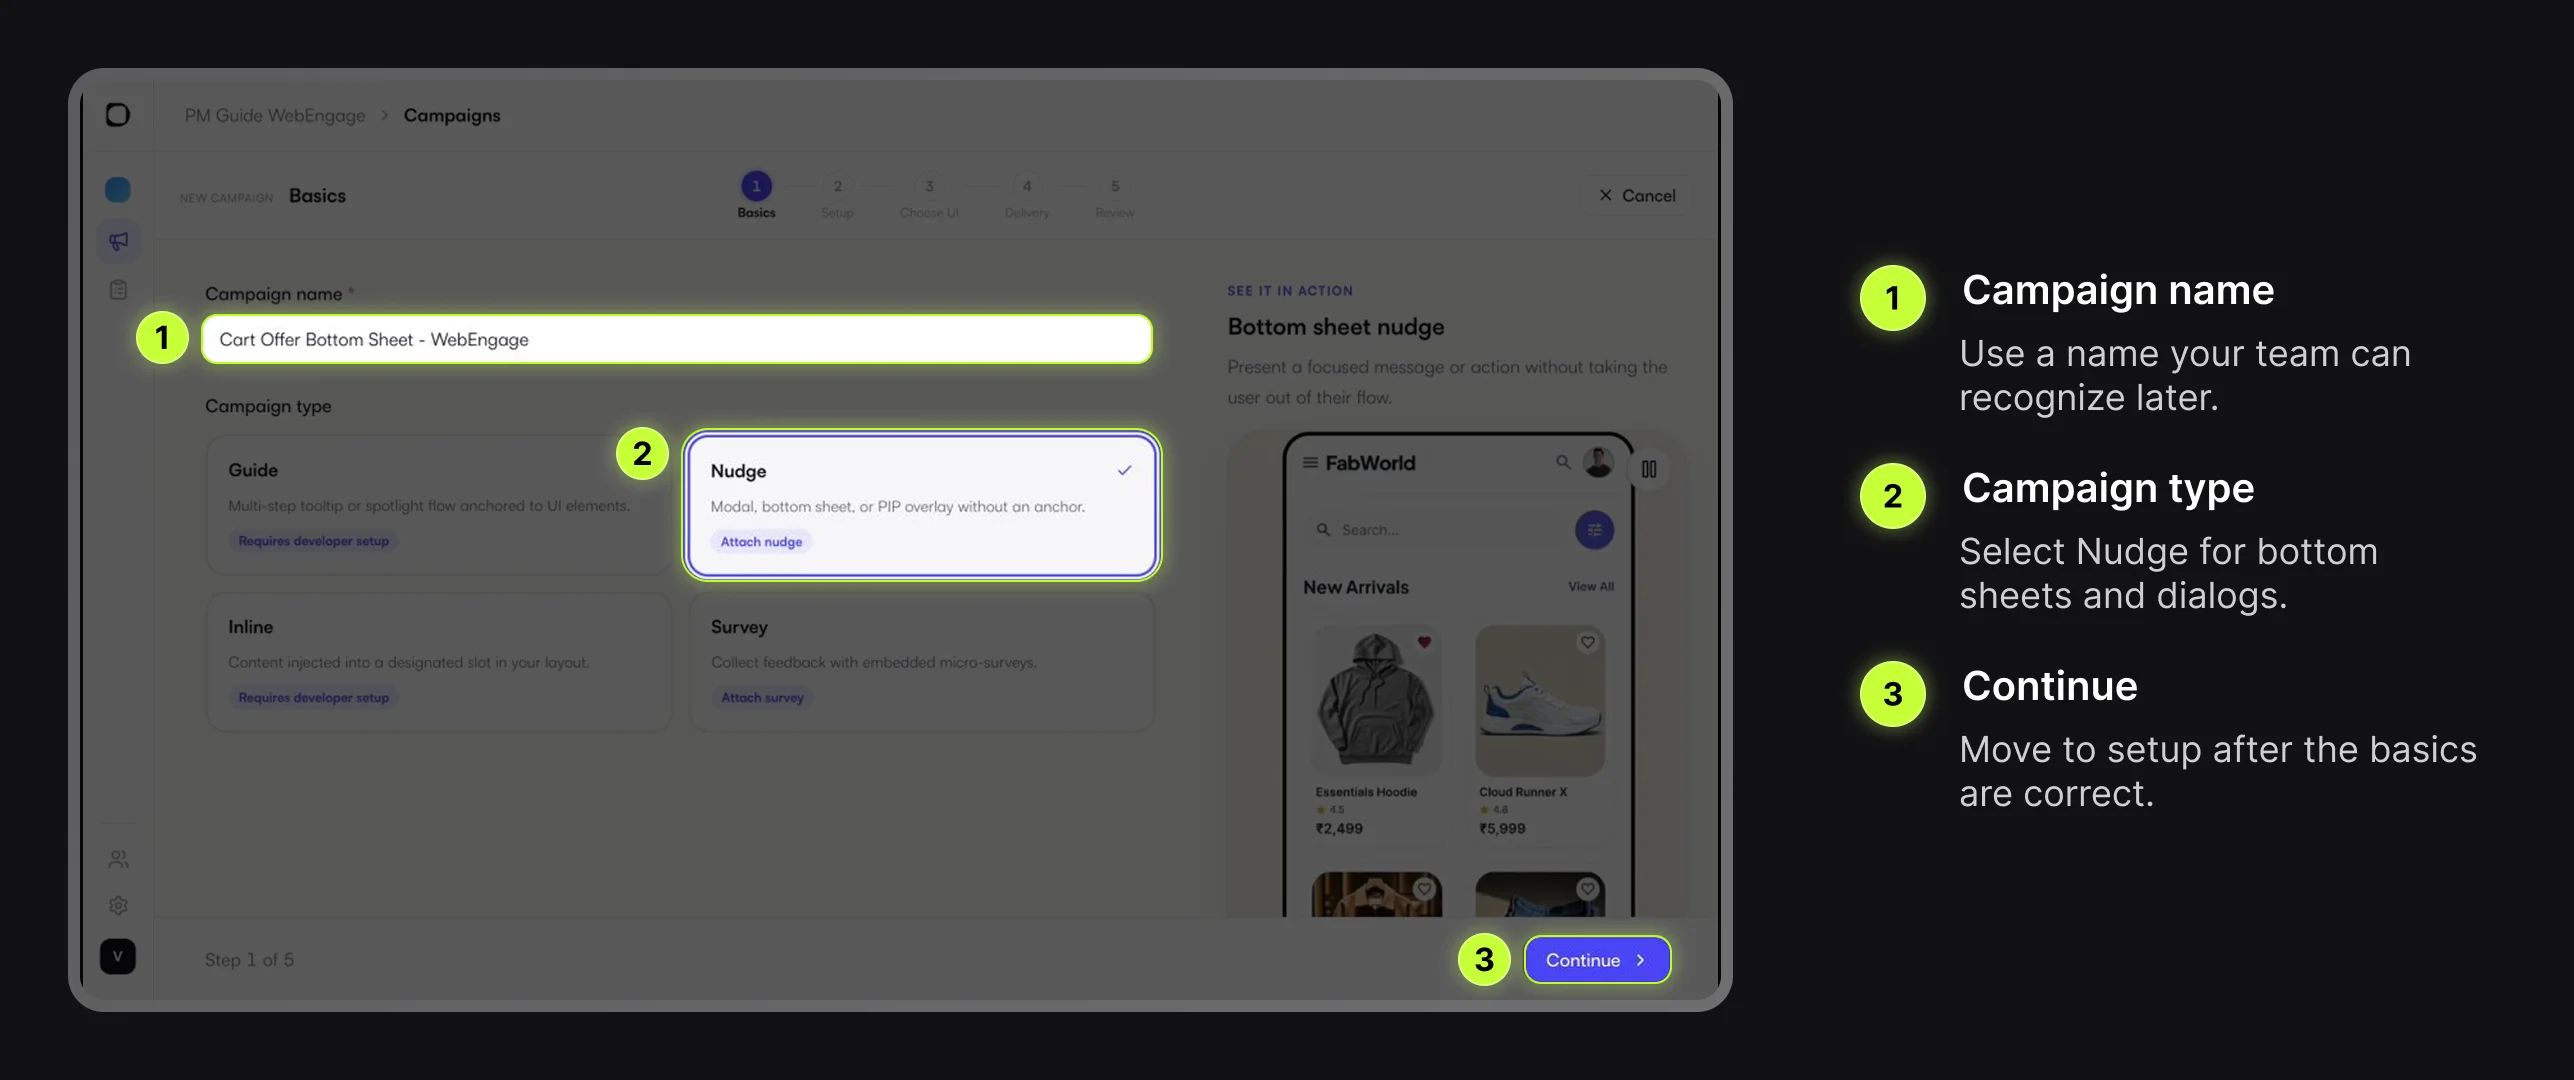
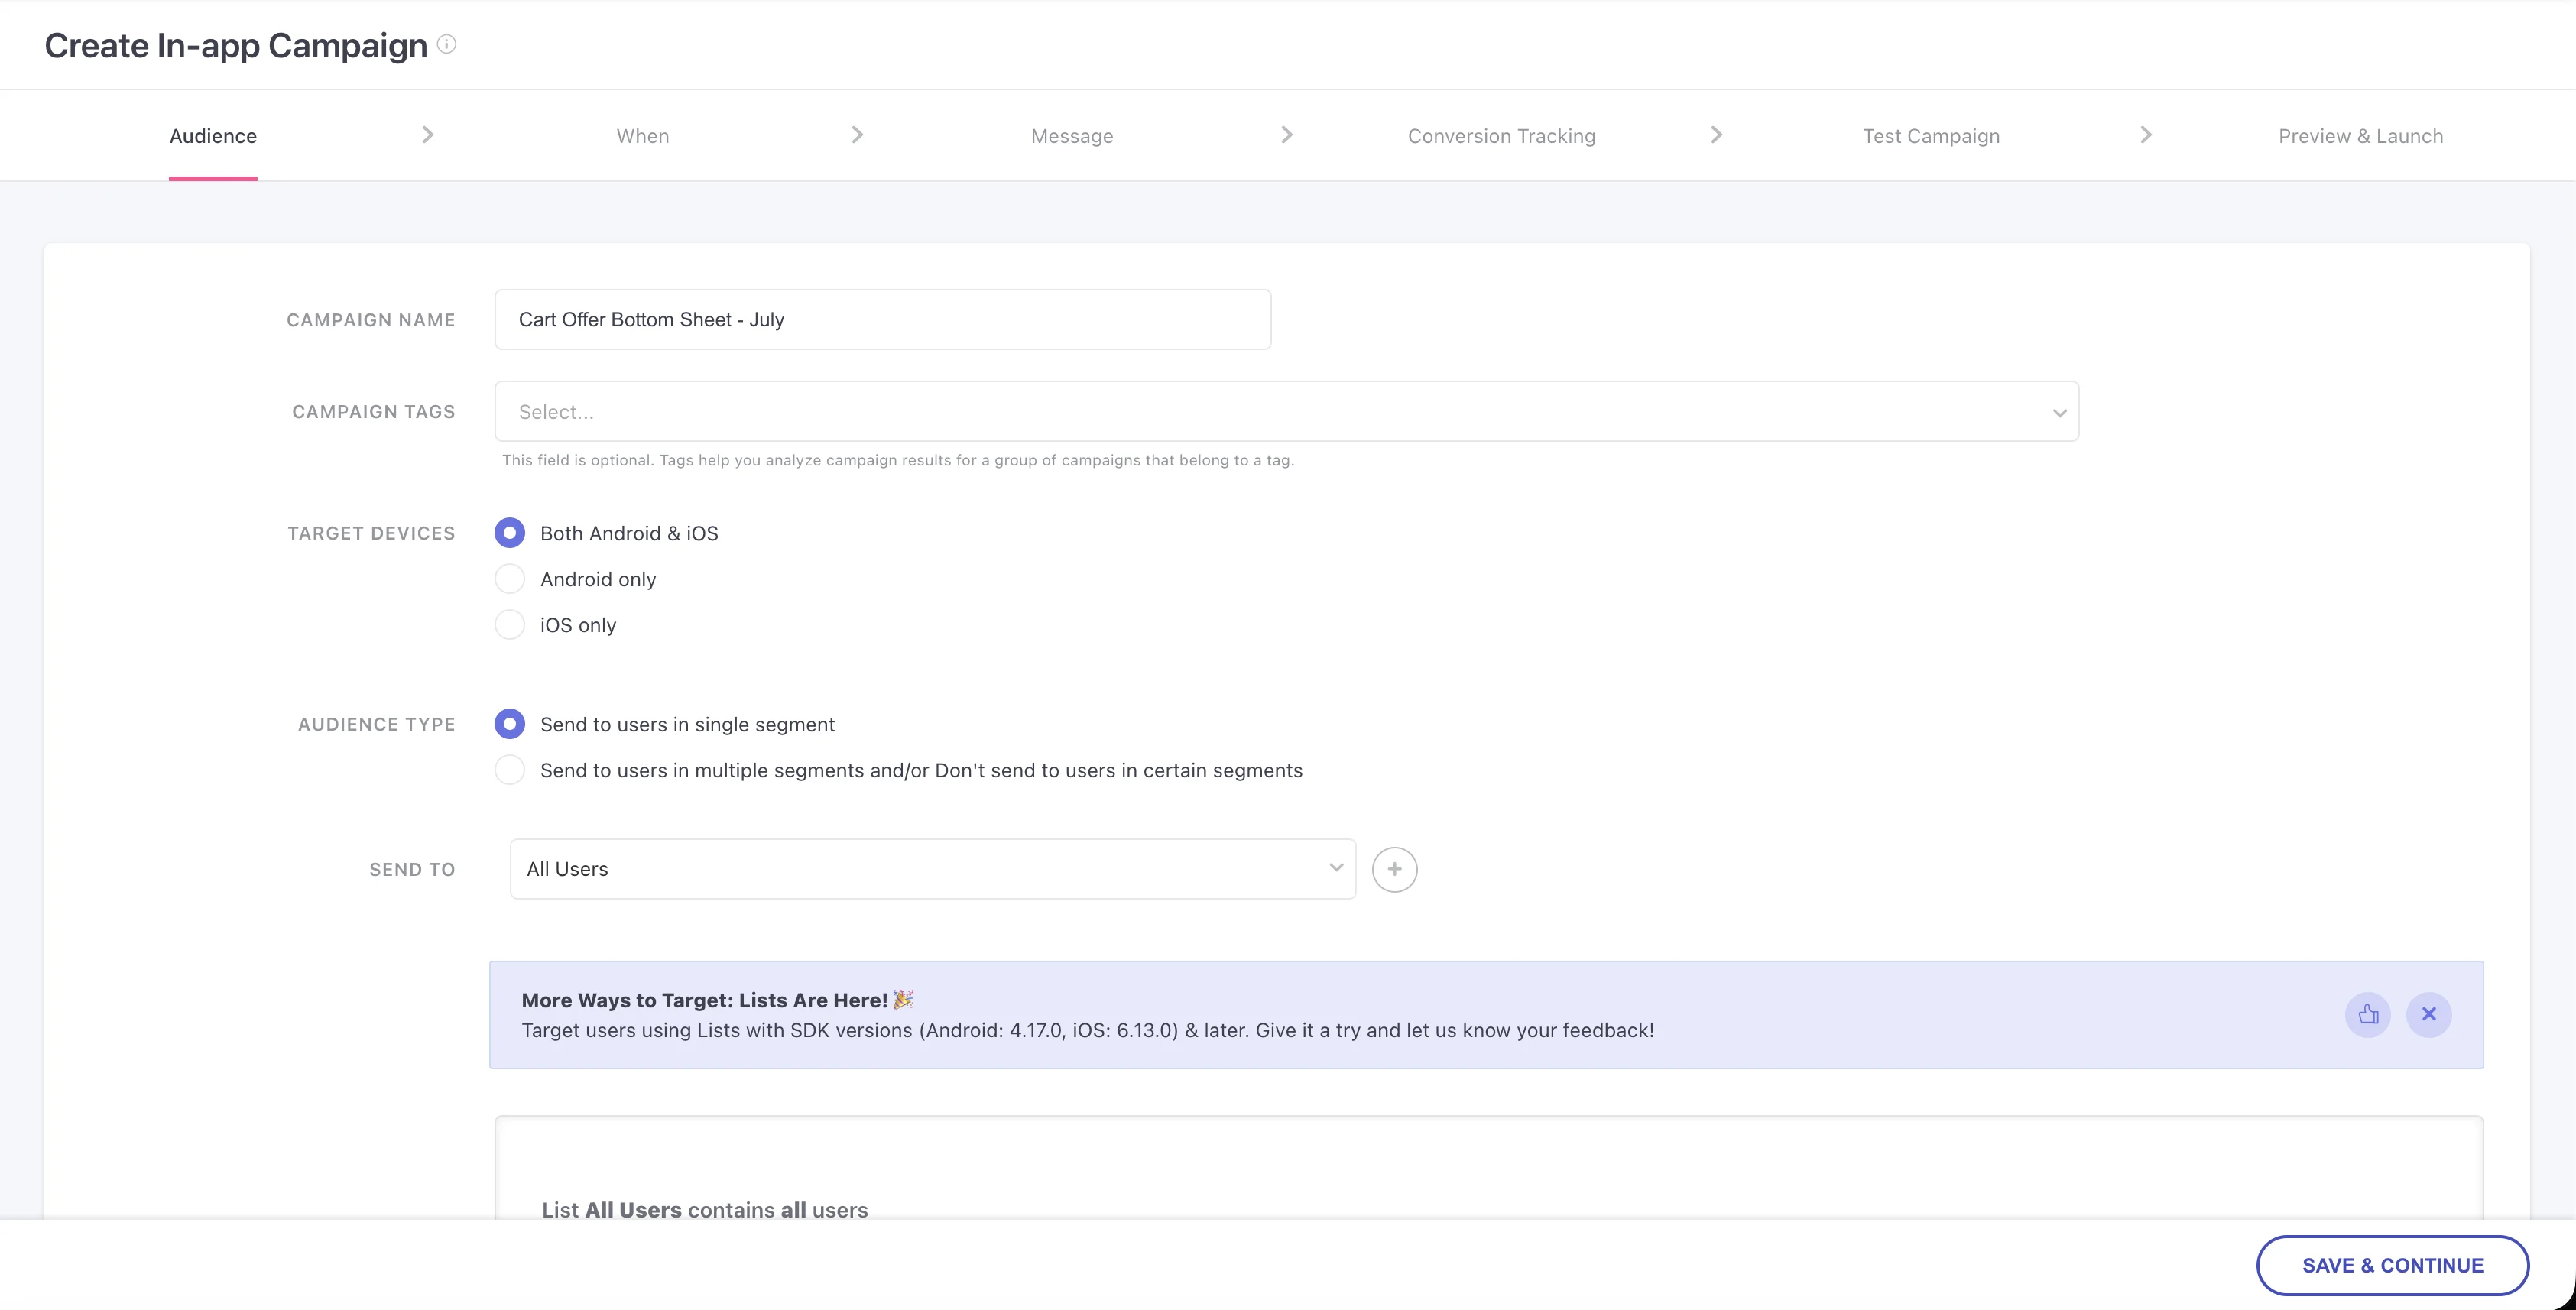
Go to Campaigns and choose New Campaign. Use a name your team can recognize later, such as:
Cart Offer Bottom Sheet - July
On the Basics step, enter the campaign name, select Nudge, and continue. Digia creates a campaign key from the name. You will use this key in WebEngage later.
Add Variables, If Needed
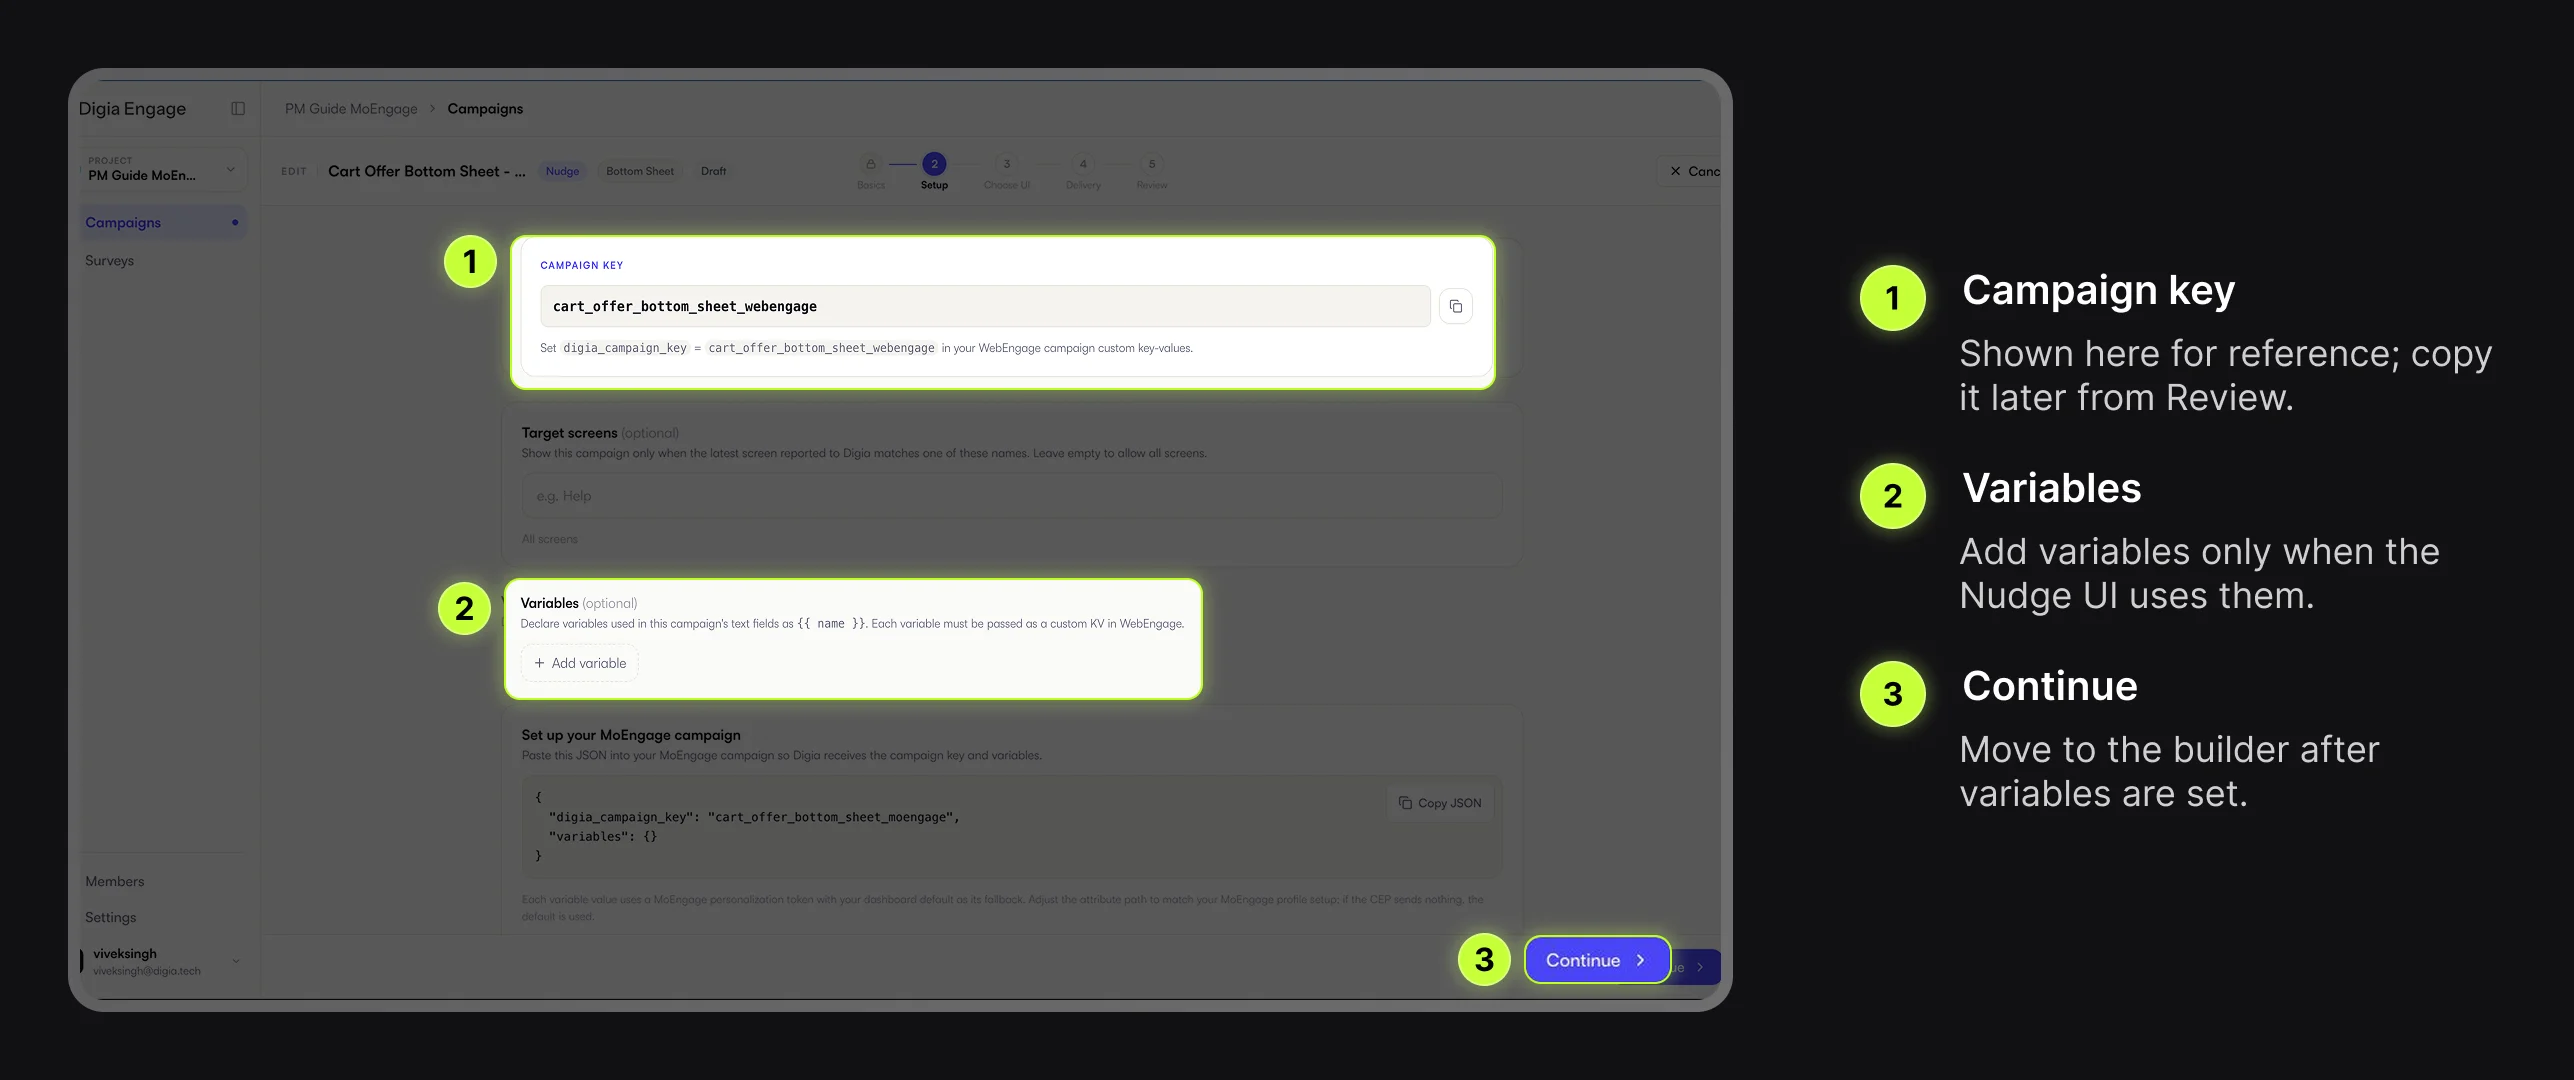
The Setup step shows the campaign key and lets you declare variables that the UI will use. If your Nudge uses dynamic values, add them before you design the UI.
| In the Nudge copy | Variable name |
|---|---|
Use {{coupon}} at checkout | coupon |
Offer ends at {{expiry_time}} | expiry_time |
Hi {{first_name}}, this is for you | first_name |
Variables are optional. If every piece of text is fixed, you can skip this part.
Design the Nudge
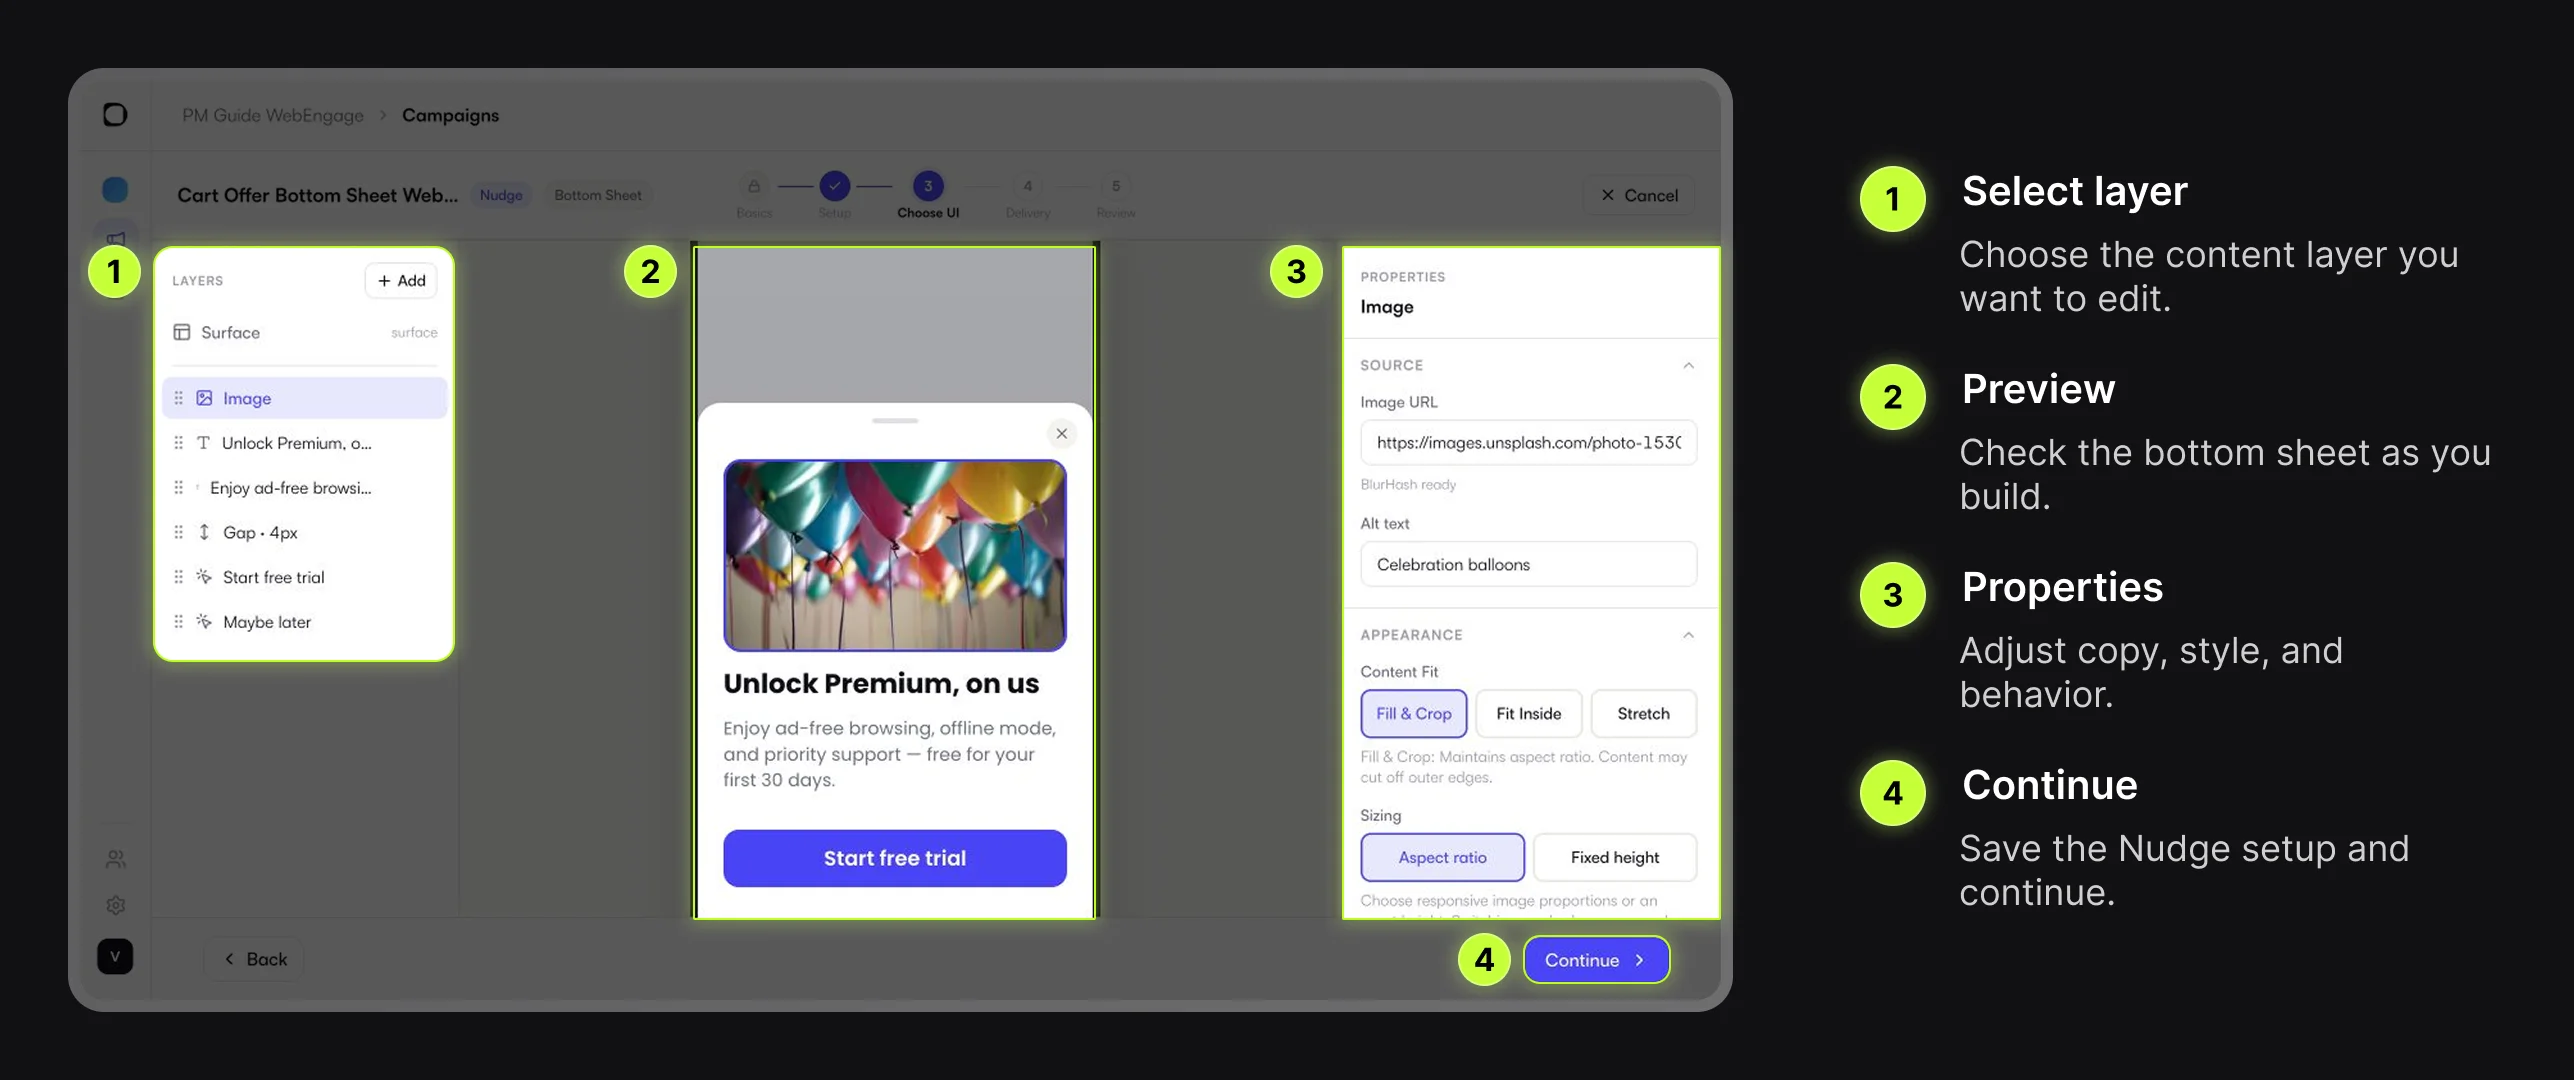
Use the visual builder to add and edit the content. The left panel lists layers, the middle panel shows the mobile preview, and the right panel shows attributes for the selected layer.
A simple campaign might include an image, headline, short body copy, one primary button, and a close action. Keep the message focused on one outcome, preview it on the smallest device size you support, and make sure text does not clip.
For the primary CTA, choose the tap behavior, such as opening a deep link, opening a URL, copying a code, or closing the sheet.
Once the Nudge UI is saved, use Live Testing Campaigns to send it to a connected debug device and check the experience before moving into delivery, review, and WebEngage setup.
Set Delivery Rules in Digia
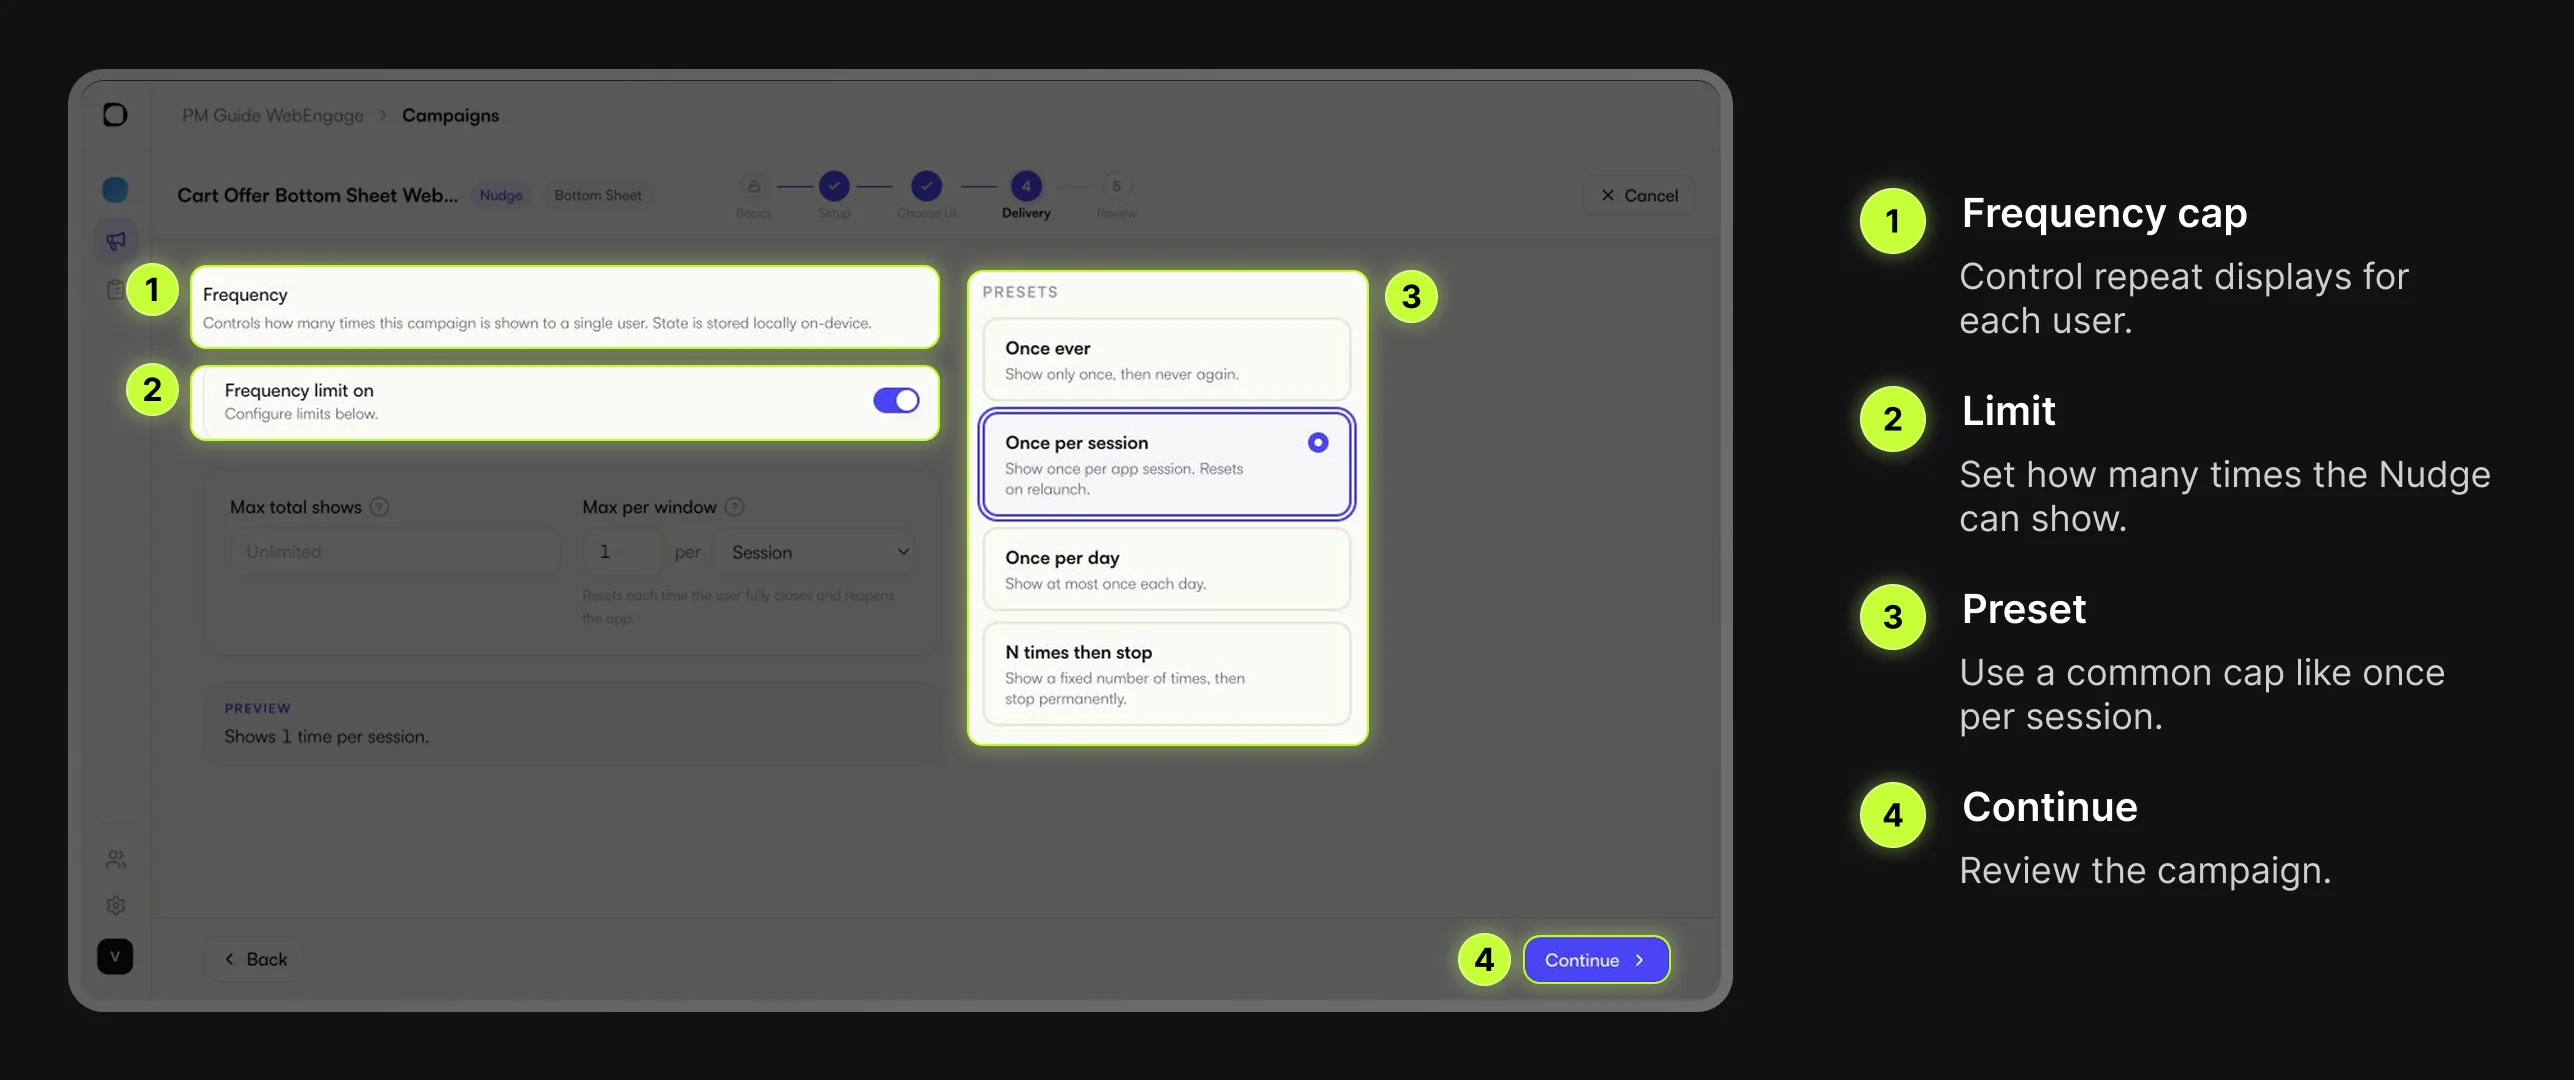
On the Delivery step, choose how often Digia is allowed to show this Nudge to the same user. WebEngage controls who qualifies and when the trigger happens. Digia controls whether the Nudge should still render after WebEngage fires.
| Frequency cap | When to use it |
|---|---|
| Once ever | One-time announcements or onboarding messages |
| Once per session | Cart, checkout, or browsing prompts |
| Once per day | Daily offers or reminders |
| N times then stop | Reminders that should eventually stop |
Review and Copy WebEngage Config
On the Review step, check the name, campaign type, surface, content, CTA, and frequency cap. You can save as draft while WebEngage setup is pending, or activate when the Nudge is ready. Nothing shows to users until the WebEngage campaign is configured and live.
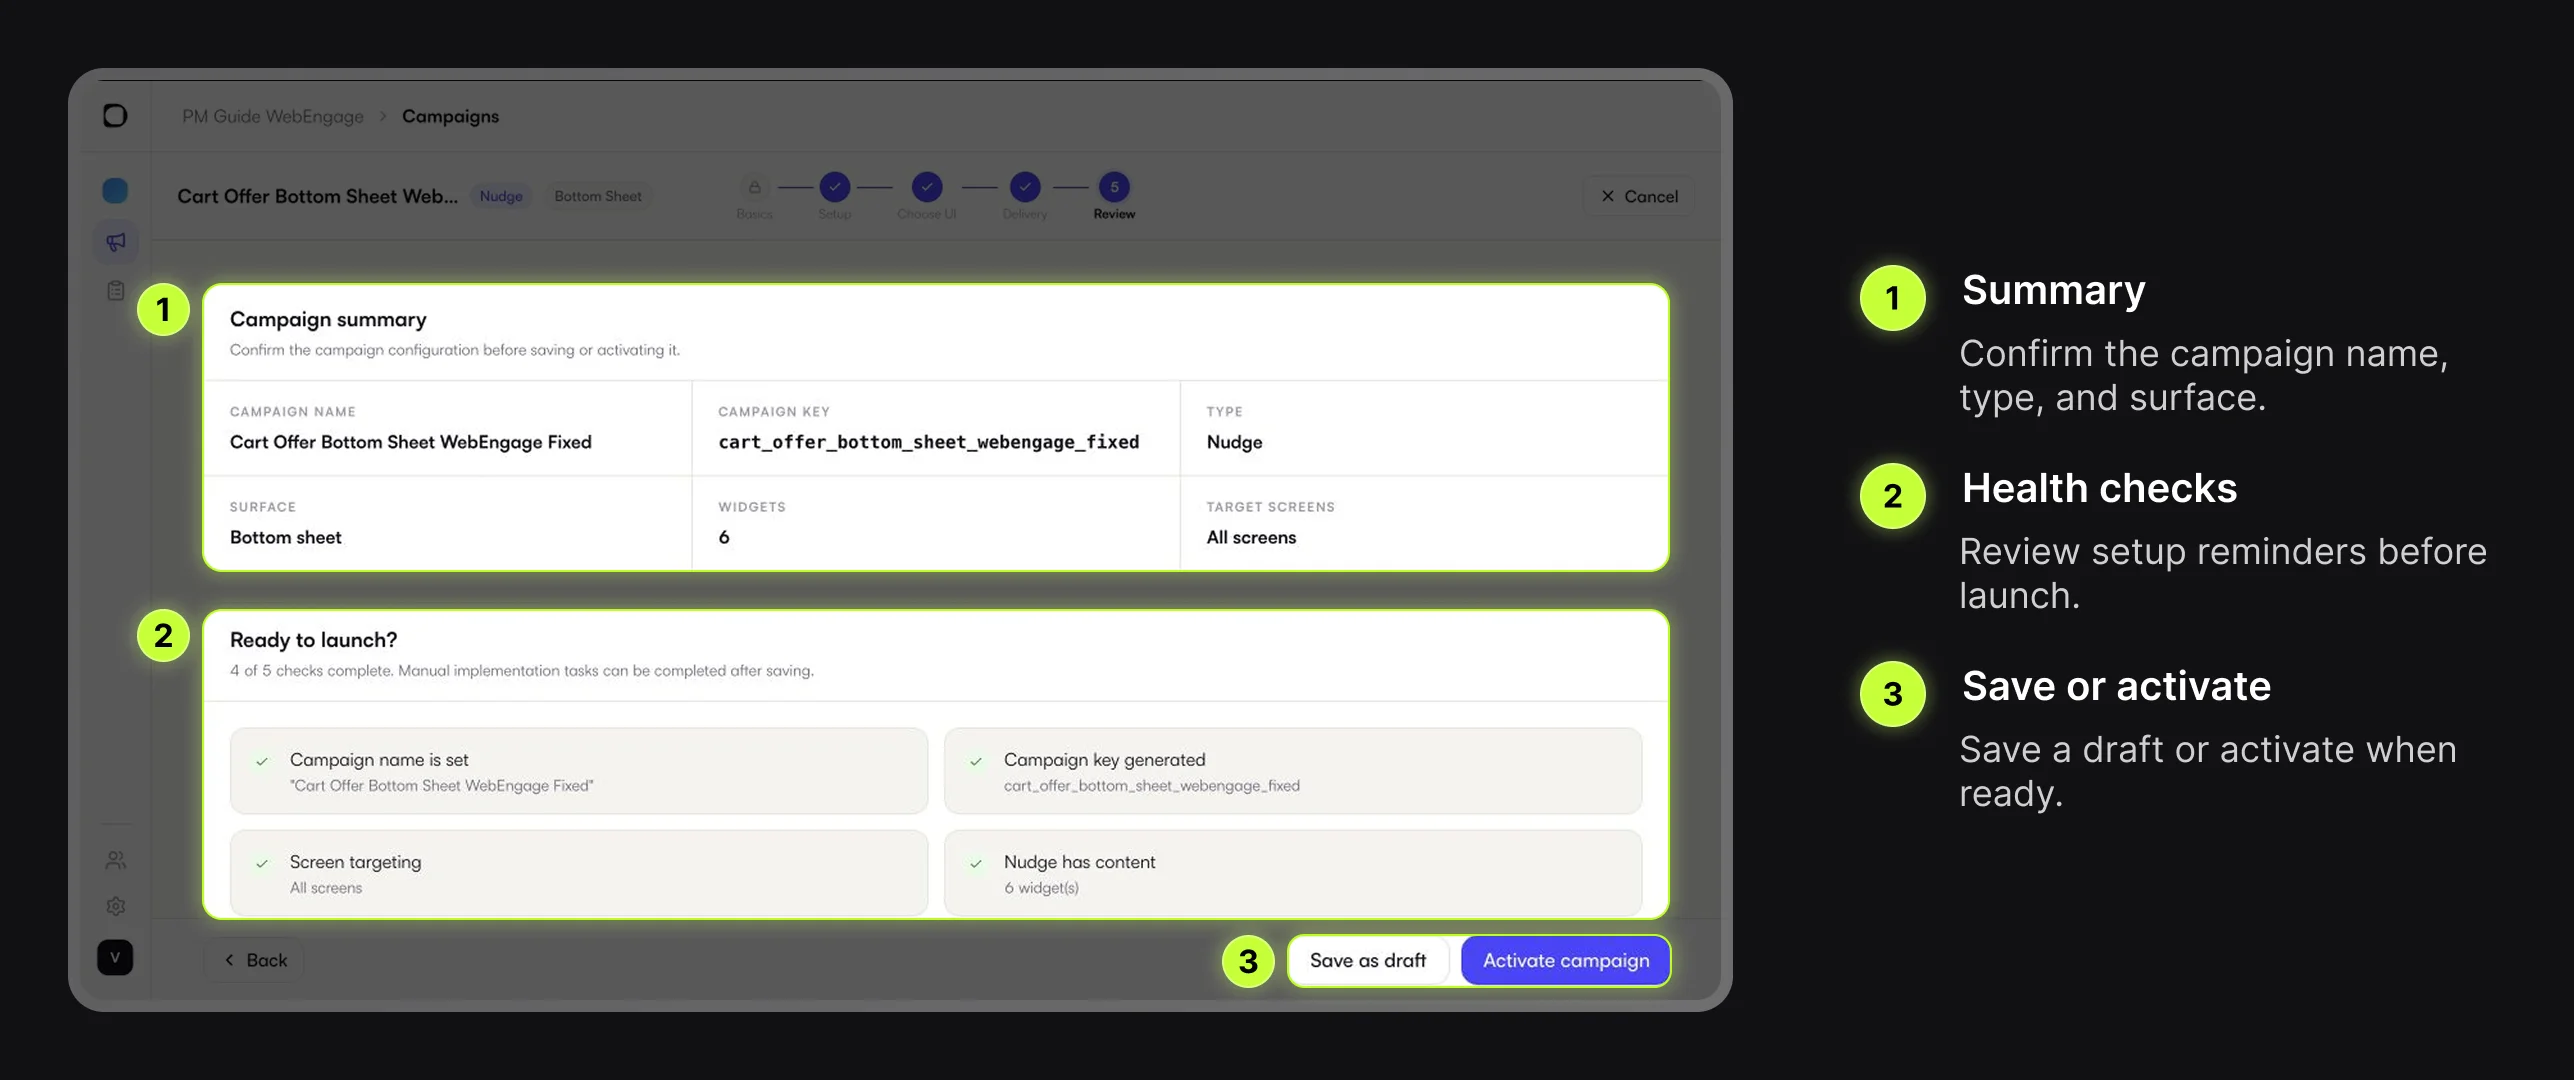
Copy the Digia campaign key from the WebEngage setup section in Digia. If the campaign uses variables, copy the variables config too.
Create the WebEngage In-App Custom HTML Campaign
Create a WebEngage In-App campaign and use Custom HTML for the content step. WebEngage decides the audience, trigger event, schedule, and priority. Digia decides what renders after the campaign fires.
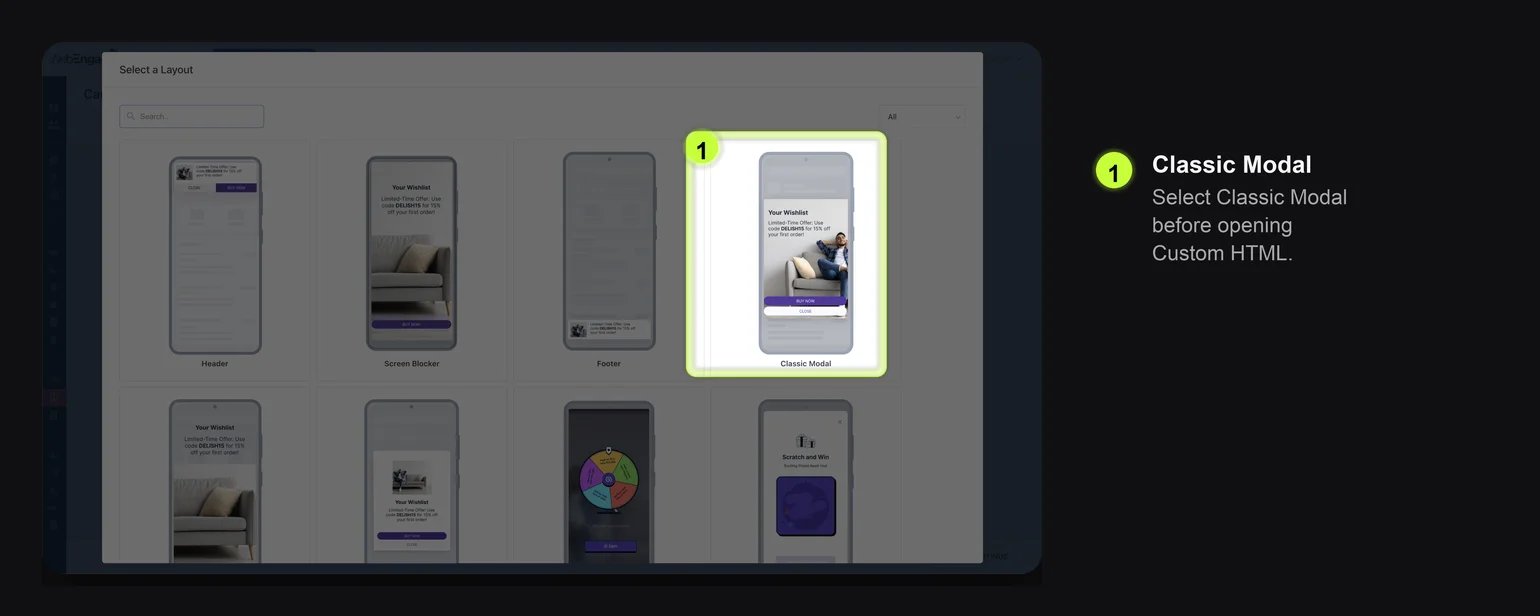
Choose Classic Modal as the In-App layout. Then use Custom HTML for the message content.
Link WebEngage to the Digia Campaign
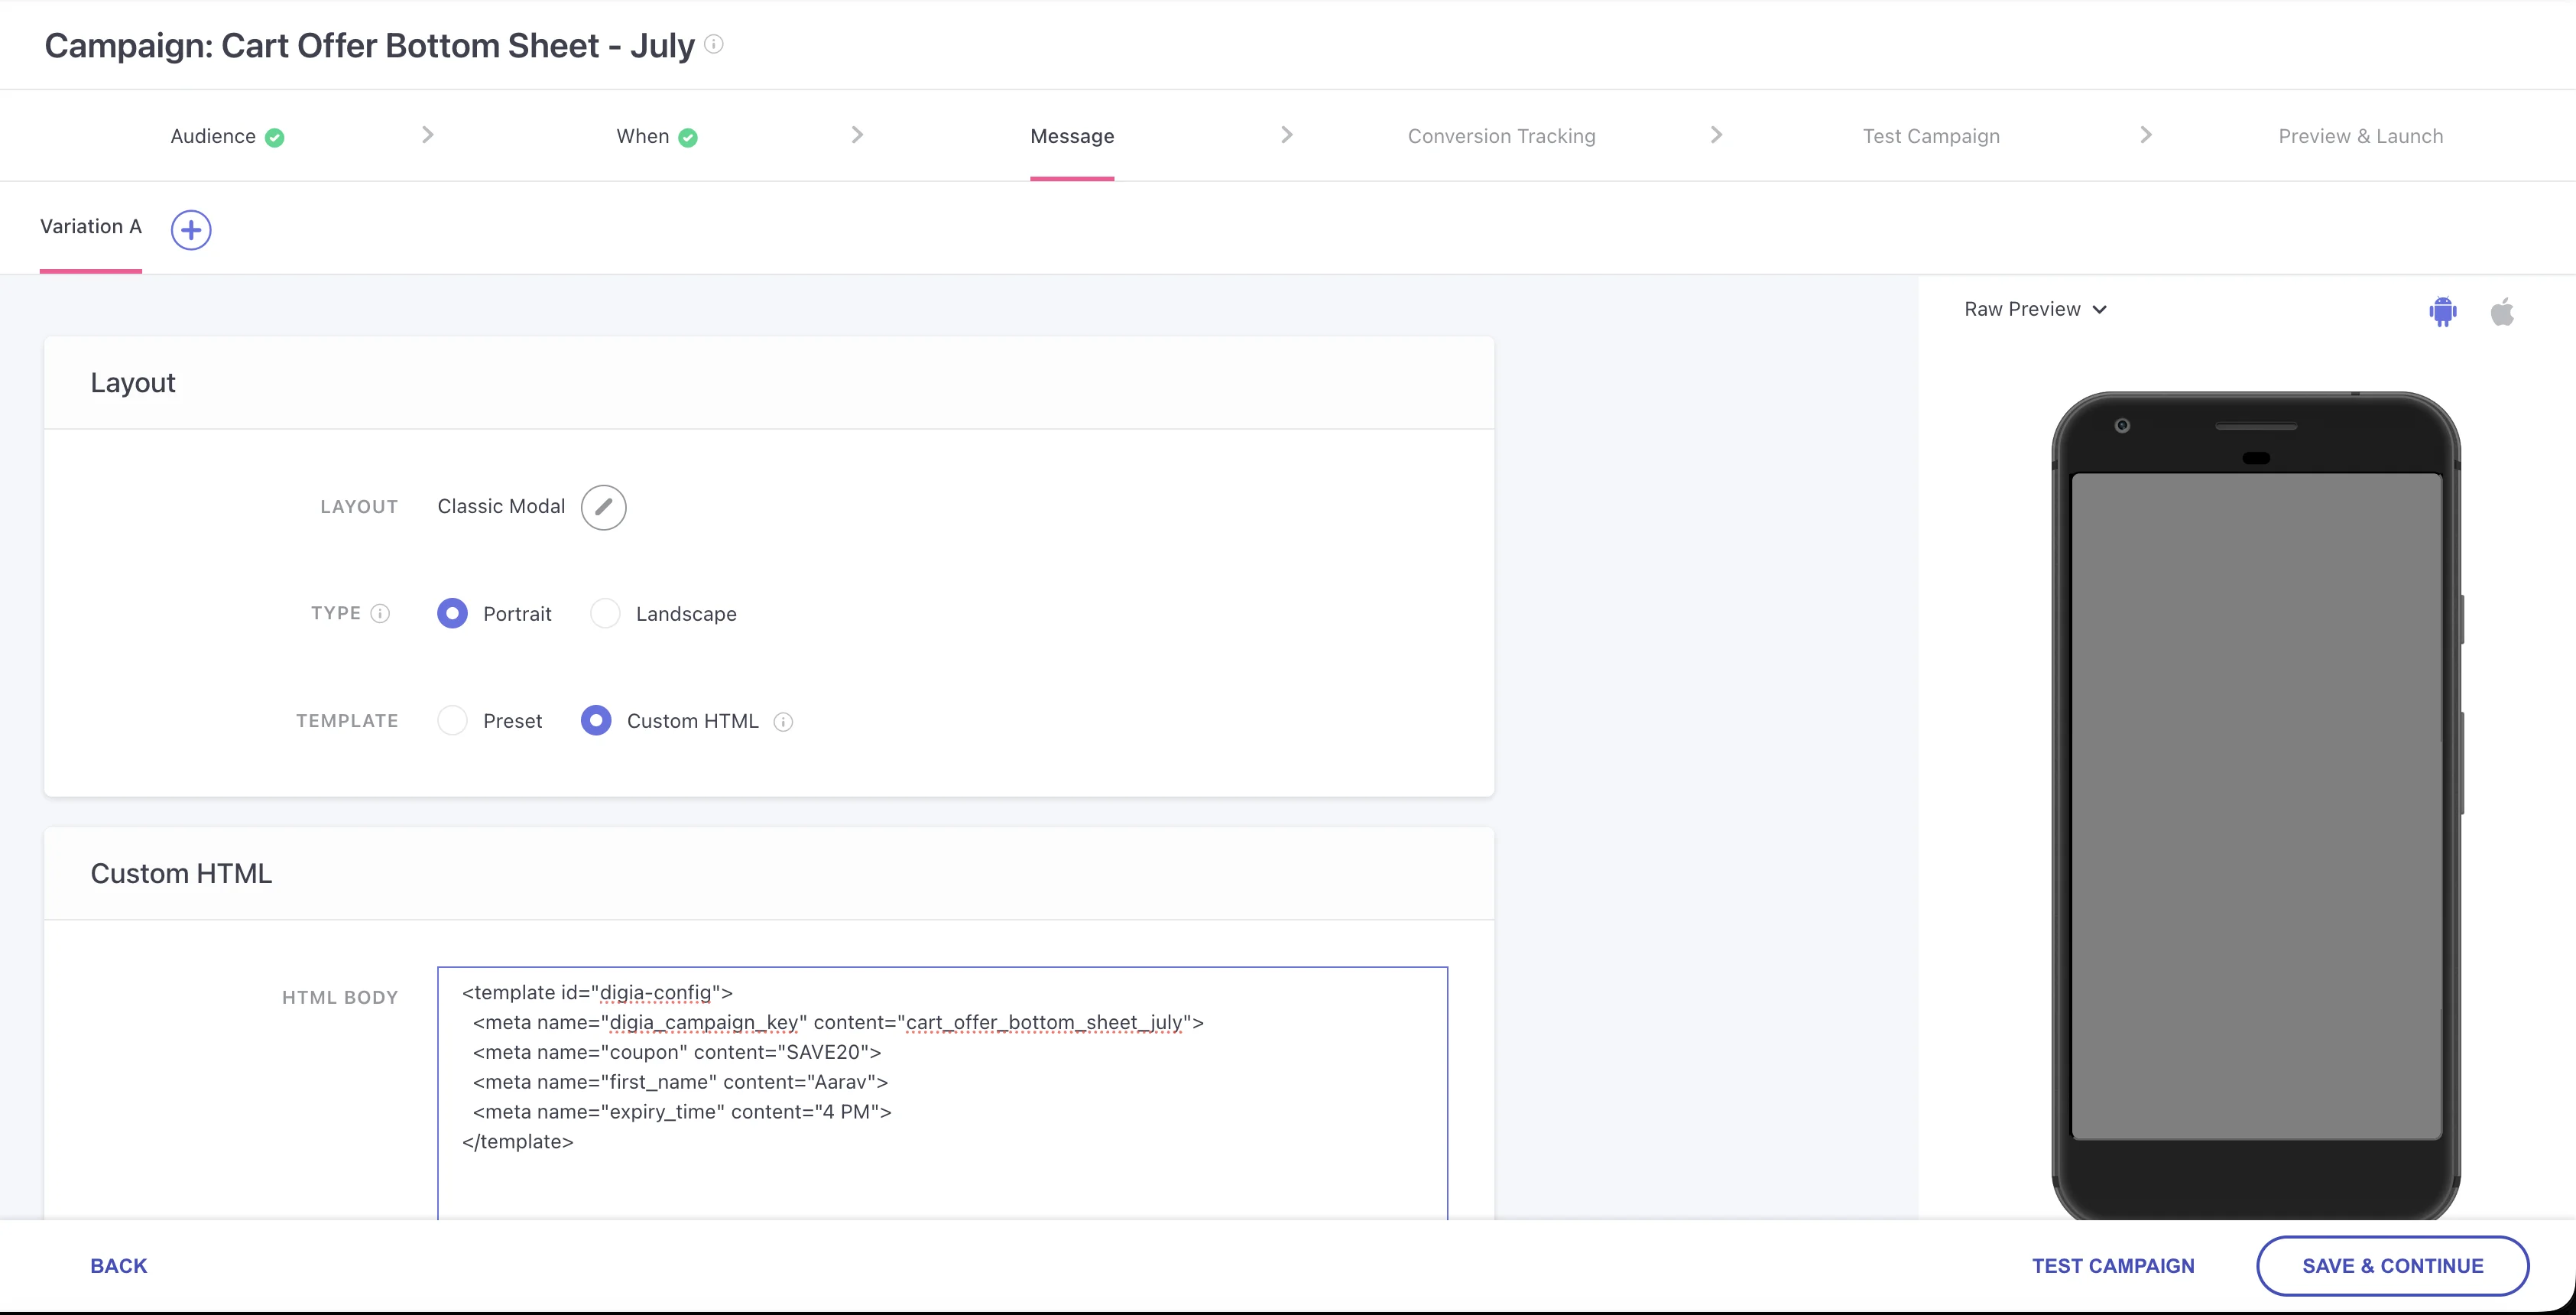
In the Custom HTML editor, add a digia-config block. The digia_campaign_key meta tag is required. Add more meta tags only for variables used by your Digia UI.
WebEngage Custom HTML digia-config block
<template id="digia-config">
  <meta name="digia_campaign_key" content="cart_offer_bottom_sheet_july">
  <meta name="coupon" content="SAVE20">
  <meta name="first_name" content="Aarav">
  <meta name="expiry_time" content="4 PM">
</template>
Use the exact campaign key copied from your own Digia campaign. Keep the Nudge layout, copy, actions, and frequency cap in Digia; WebEngage should only carry the campaign key and optional runtime variables.
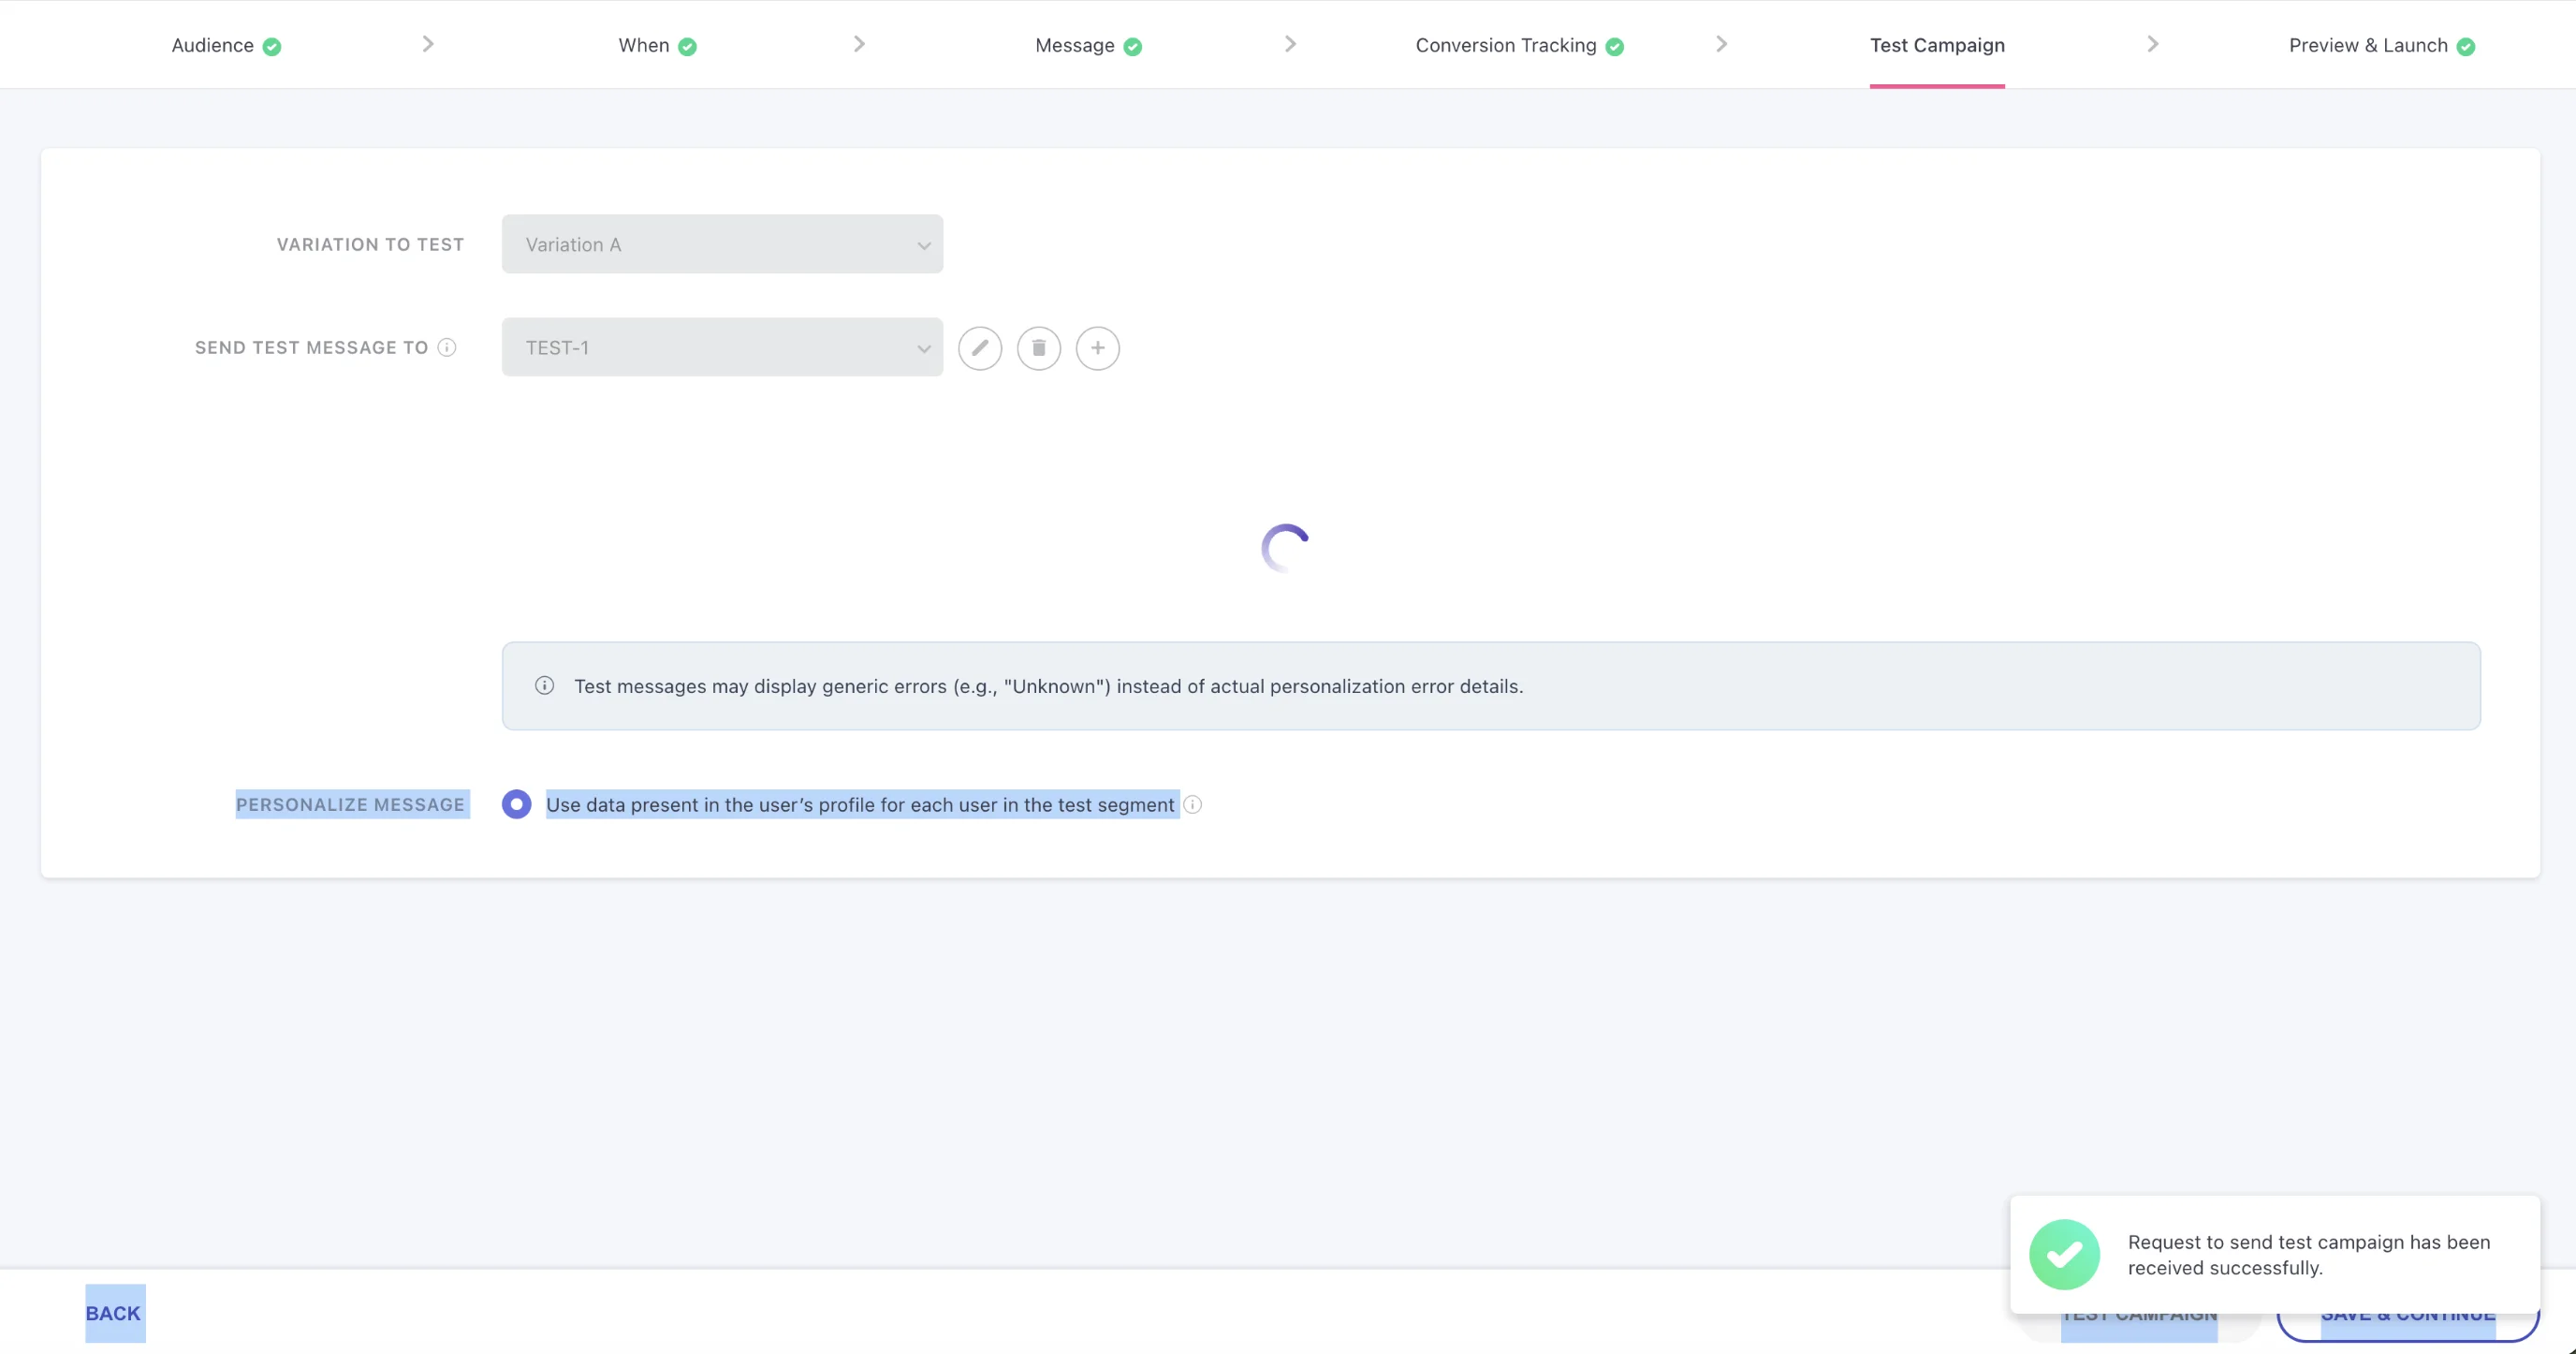
Test the Campaign End to End
- Use a test audience in WebEngage.
- Activate or preview the WebEngage campaign for that test audience.
- Trigger the event from a test device.
- Confirm the bottom sheet appears in the app.
- Tap the primary CTA and confirm it performs the expected action.
- Dismiss the Nudge and confirm the frequency cap behaves as expected.
If the campaign does not appear, check:
| What to check | Why it matters |
|---|---|
| The Digia campaign is active | Draft campaigns will not render for users |
digia_campaign_key matches exactly | The key is case-sensitive |
| The WebEngage campaign uses In-App Custom HTML | The Digia plugin only receives the expected payload format |
| The user qualifies in WebEngage | WebEngage owns audience and trigger rules |
| The trigger event fired | WebEngage only sends the campaign after its trigger |
| Frequency cap has not already been reached | Digia may suppress repeat renders |
WebEngage can sometimes take time to start delivering a newly activated campaign. If the campaign still does not appear after your usual campaign propagation window, reach out to Digia support.
Launch Checklist
- Digia campaign is active.
- WebEngage campaign uses In-App Custom HTML.
digia_campaign_keymatches the Digia campaign key.- Variables are valid.
- Audience and trigger rules are correct in WebEngage.
- Frequency cap is set in Digia.
- The campaign was tested on at least one real device.
Recap
- Create a Nudge campaign in Digia.
- Add only the variables the UI needs.
- Design and preview the bottom sheet.
- Set Digia delivery rules.
- Copy the campaign key into a WebEngage campaign and test on device.